How to use diskpart to clean and format drive not working on windows 10
Содержание:
- diskpart in Windows 10
- Параметр create volume raid
- Using Disk Management to Create Partition
- Как работает diskpart
- diskpart in Windows 7
- Extend Partition with Windows 10 Disk Management
- AOMEI Partition Assistant Pro Vs Windows 10 Disk Management
- Как использовать chkdsk для проверки диска на наличие ошибок из командной строки или PowerShell
- Запуск DiskPart при загрузке в Windows:
- Создание EFI-раздела перед Windows
- MBR и GPT разделы – файловая система
- How to open Diskpart in Windows 7?
- Format disk partition with gui
- Solution 3 — Extend volume on Windows 10 with 3 freeware
- Параметр create volume stripe
- Other ways to format disk partition
- How to Convert Logical Partition to Primary with MiniTool Partition Wizard?
- How to create partition using DiskPart?
diskpart in Windows 10
If you can boot into Windows 10
If you can boot into your Windows 10 system, you simply need to open Command Prompt to access diskpart. To do so, follow these steps:
- Boot into Windows 10
- Press the Windows key and C to open the charm bar
- Type
- Click Command Prompt
- When Command Prompt opens, type
- Press Enter
For the full list of diskpart commands and paremeters, go to .
If you can’t boot into Windows 10
If you can’t boot into your Windows 10, you have these options available:
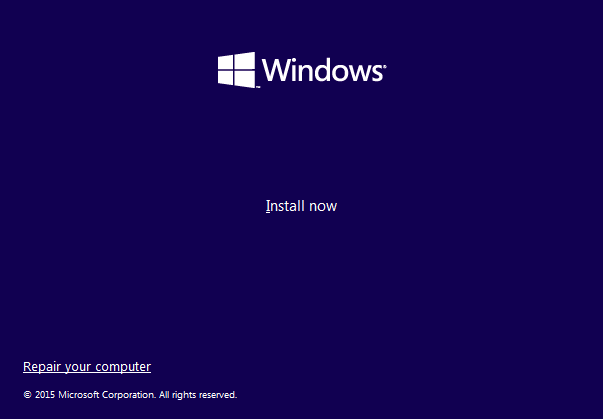
- Use the original DVD or USB with Windows 10 to access the Repair your computer option
- Boot into the System Recovery Options with Shift and F8
- Use Easy Recovery Essentials to launch Command Line
If you have the installation disc:
If you can’t boot, but you have the installation disc, follow these steps:
- Insert the Windows 10 or USB
- Restart the computer
- Press any key to boot from the media
- Click Repair your computer or press R
- Select Troubleshoot
- Select Command Prompt
- Type
- Press Enter
For the full list of diskpart commands and paremeters, go to .
If you don’t have the installation disc:
If you don’t have the installation disc, you can boot into System Recovery Options or use Easy Recovery Essentials.
To access diskpart without an official Windows 10 media, follow these steps:
- Reboot the system
- Press Shift and F8 very quickly
- At Choose an option, select Troubleshoot
- Select Command Prompt
- Type
- Press Enter
For the full list of diskpart commands and paremeters, go to .
If you use Easy Recovery Essentials:
Easy Recovery Essentials can run from any CD, DVD or USB flash drives.
To access diskpart using Easy Recovery Essentials, follow these steps:
- Download Easy Recovery Essentials
- Burn the ISO Image. Follow our instructions on how to burn a bootable ISO image. If you’d like to have a recovery USB instead, follow our instructions on how to make a recovery USB.
- Boot Easy Recovery Essentials from the CD, DVD or USB
- Select Launch Command Line
Параметр create volume raid
Создание тома RAID-5 на указанных динамических дисках. После создания тома фокус автоматически перемещается на этот том.Синтаксис:
- — Размер дискового пространства в мегабайтах (Мбайт), который том будет занимать на каждом диске. Если размер не указан, создается том RAID-5 максимального возможного размера. Размер тома RAID-5 определяется диском с наименьшим размером непрерывного свободного места. Объем того же размера выделяется на каждом диске. Фактический объем доступного дискового пространства на томе RAID-5 меньше суммы всего занятого дискового пространства, поскольку некоторая его часть требуется для четности
- — Динамические диски, на которых создается том. Объем, равный значению size=n, выделяется на каждом диске
- — Только для сценариев. Если задан этот параметр, при возникновении ошибки программа DiskPart продолжает обрабатывать команды, как если бы ошибки не было. Если параметр noerr не задан, при возникновении ошибки работа программы DiskPart завершается и выдается код ошибки
Using Disk Management to Create Partition
Disk Management is not as powerful as MiniTool Partition Wizard Free Edition, but as a Windows built-in partition manager, it can complete most simple and basic partition managements like create partition, delete partition, format partition, etc.
So if you find the Diskpart create partition is a little complicated and you don’t want to resort to third-party partition software either, you can try the Windows built-in Disk Management, which is very convenient for Windows users.
Step 1. Right-click Windows Start menu and choose Disk Management to enter into the Windows 10 Disk Management interface.
Step 2. Right-click the unallocated space and select New Simple Volume to get the New Simple Volume Wizard interface.

Step 3. Click Next and specify volume size.

Step 4. Input the size of the partition that you want to create and the click Next. If you don’t input a specified number, it will create a partition with all the unallocated space as default.

Step 5. Assign a drive letter and click Next.

Step 6. At this page, you can format the partition and set file system, allocation unit size and volume label for the partition. Then click Next to format this partition.

Step 7. Click Finish to complete creating a new partition in Windows 10.

Tip: If you fail in creating a new partition, you may check this post: Fix — Disk Already Contains Maximum Number of Partitions Error.
Step 8. Then when you get back to the main interface, you can see the new partition has been created.

After reading this post, you can see that diskpart is not the only way to create partition Windows 10. If you don’t like to create partition using commands, try using diskpart create partition alternatives.
Как работает diskpart
Создание загрузочного флеш-накопителя через консольную утилиту diskpart является быстрым и доступным способ. Благодаря тому, что данная утилита работает в текстовом режиме, каждый пользователь персонального компьютера с легкостью справится с такой задачей.
С быстрым развитием технологий, каждому человеку доступен выход в Интернет, где можно найти бесплатные версии различных программ по созданию загрузочного флеш-накопителя
Однако случается и такое, что доступ к Интернету отсутствует в силу каких-либо обстоятельств, поэтому важно знать несколько простых альтернативных способов создания загрузочного флеш-накопителя
Один из них — описанный метод, применяющий командную строку. Такой ручной способ пригодится каждому пользователю ПК. Эта консольная утилита входит в перечень стандартных программ. Нет необходимости дополнительно искать и устанавливать какие-либо другие программы по настройке загрузочного флеш-накопителя. Через десять минут использования diskpart готова загрузочная флешка с установочным файлом Windows.
diskpart in Windows 7
On Windows 7 systems, you can access diskpart .
Note that you need to run these steps as an Administrator on Windows 7 computers.
If you can boot into Windows 7
If you can boot into your Windows 7 system, simply open Command Prompt:
- Boot into Windows 7
- Click Start
- Type
- Click Command Prompt from the search results list. Right-click on Command Prompt > Run as Administrator.
- When Command Prompt loads, type
- Press Enter
For the full list of diskpart commands and paremeters, go to .
If you can’t boot into Windows 7
Similar to Windows Vista, if you can’t boot into your system, you have the following options:
- Use the installation disc
- Boot into the Advanced Boot Options menu to access System Recovery Options
- Use Easy Recovery Essentials and access Command Line
If you have the installation disc:
If you can’t boot into Windows 7, but you have the installation disc, you can run diskpart using the disc. To do so, follow these steps:
-
- Insert the disc in the optical drive of your computer
- Restart the computer
- Press any key to boot from the disc
- Select your preferred language, time and keyboard
- Click Next
- Click Repair your computer at the Install Windows screen
- Select the operating system from the list
- Click Next
- Select Command Prompt
- Type diskpart
diskpart
- Press Enter
For the full list of diskpart commands and paremeters, go to .
If you don’t have the installation disc:
Usually, Windows 7 systems should have the System Recovery Options installed on the hard drive. If it’s not (follow steps below), go to the “If you use Easy Recovery Essentials” set of instructions below for an alternative to access diskpart.
Follow these steps to access diskpart without an installation disc on a Windows 7:
- Restart the computer
- Press F8 as the computer starts to boot. Press F8 before the Windows 7 logo appears.
- Select Repair Your Computer at the Advanced Boot Options screen
If Repair Your Computer is not listed, System Recovery Options is not installed on your PC. Go to If you use Easy Recovery Essentials for an alternative.
- Press Enter
- Select Command Prompt
- Type
- Press Enter
For the full list of diskpart commands and paremeters, go to .
If you use Easy Recovery Essentials:
Easy Recovery Essentials can run from any CD, DVD or USB flash drives.
To access diskpart using Easy Recovery Essentials, follow these steps:
- Download Easy Recovery Essentials
- Burn the ISO Image. Follow our instructions on how to burn a bootable ISO image. If you’d like to have a recovery USB instead, follow our instructions on how to make a recovery USB.
- Boot Easy Recovery Essentials from the CD, DVD or USB
- Select Launch Command Line
Extend Partition with Windows 10 Disk Management
Maybe most of Windows 10 desktop and laptop users have come across the problem of low disk space, especially for system partition. With Disk Management in Windows 10, you can reduce the influence of low disk space in some ways. To use this tool, you should know how to open Windows 10 Disk Management, so we introduce 3 ways for you.
-
Way 1: The easiest way to open Disk Management in Windows 10 is from computer Desktop. Right click on Start Menu (or press Windows+X hotkey) and then select «Disk Management».
-
Way 2: Use Windows+R hotkey to open Run window. Then type «Diskmgmt.msc» and click «OK» or hit «Enter» key.
-
Way 3: Directly type «disk management» in the Search box and choose «Create and format hard disk partitions» from the results.
After you open Disk Management, right click the partition you would like to expand and then choose Extend Volume (e.g. C partition).
When you use Windows 10 Disk Management to extend a partition, sometimes you may find the Extend Volume option is grayed out.
Is there something wrong with this tool? No, the reason is that the function of Extend Volume in Windows 10 is only available when there is contiguous unallocated space behind the partition you would like to extend. What can you do when you don’t have unallocated space on hard drive?
AOMEI Partition Assistant Pro Vs Windows 10 Disk Management
| Features | AOMEI Partition Assistant Pro | Windows 10 Disk Management |
| Create partition, delete partition, format partition, change drive letter | ||
| Extend/Shrink NTFS partition | ||
| Extend/Shrink FAT32 partition | ||
| Merge partitions, merge unallocated space, move partition | ||
| Allocate free space from one partition to another | ||
| Convert MBR to GPT disk, convert GPT to MBR disk without data loss | ||
| Convert dyanmic disk to basic disk without data loss | ||
| Convert primary to logical partition, convert logical to primary partition | ||
| Convert NTFS to FAT32 without formatting | ||
| Migrate OS to SSD or HDD | ||
| Make Windows PE bootable disc | ||
| Partition recovery | ||
| Copy disk, copy partition | ||
| Change serial number, change partition type ID | ||
| Buy AOMEI Partition Assistant Pro Now and Get Limited-Time 25% OFF |
Lifetime Free Upgrades (A maintenance agreement ensures that you will free receive all updates and new versions that are released after you buy. No need to pay an addit-ional fee for later upgrades.) US $44.96 Buy Now |
From the table, you can see AOMEI Partition Assistant Pro is more powerful than Window 10 Disk Management. Besides, it is more freely for you to any operation without losing any data. Therefore, as a user who requires many advanced features, AOMEI Partition Assistant Pro is a good choice. Besides, if you are a Windows Server user, AOMEI Partition Assistant Server is worth trying.
Как использовать chkdsk для проверки диска на наличие ошибок из командной строки или PowerShell
Чтобы проверить диск на наличие ошибок, вы должны использовать команду chkdsk . Введите chkdsk, за которым следует буква диска. Мы рекомендуем всегда использовать эту команду в сочетании с параметром / f . Это позволяет инструменту автоматически исправлять любые найденные ошибки.
Например, мы сканируем диск R: на наличие ошибок, набрав chkdsk / fr: и нажав Enter . Процесс сканирования начинается немедленно.
После завершения сканирования вы увидите отчет, похожий на тот, что на картинке ниже.
Это суммирует, сколько дискового пространства имеет раздел, сколько файлов используется системой, сколько свободного места доступно на диске, сколько поврежденных секторов было идентифицировано и так далее.
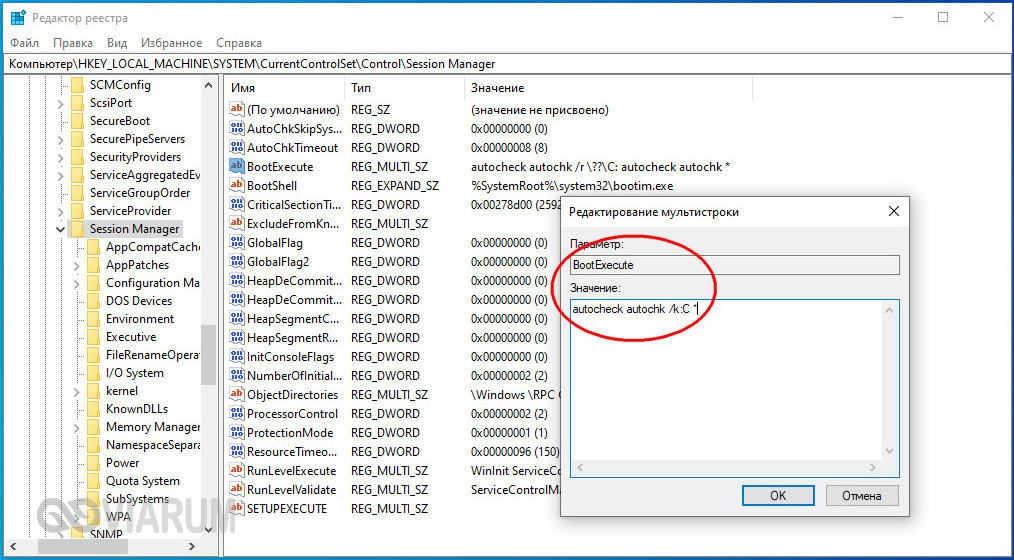
Запуск DiskPart при загрузке в Windows:
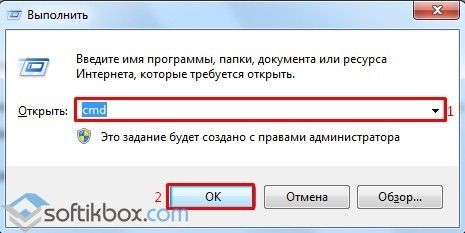
Есть разные способы запуска этой утилиты инструмент, но вот универсальный способ его запуска в любой версии Windows. Если ваша Windows работает обычно , вы можете запустить служебную программу DiskPart, открыв команду Выполнить . Вы можете открыть Выполнить , набрав его в области поиска Start Menu .
Теперь вам нужно открыть командную строку , чтобы получить доступ к DiskPart. Введите cmd в области команд «Выполнить» и нажмите клавишу Enter на клавиатуре. Будет запущена командная строка.
Внутри командной строки , введите diskpart и снова нажмите клавишу Enter . Командная строка запустит служебную программу DiskPart в новом окне с некоторой информацией о вашем компьютере вверху.
Создание EFI-раздела перед Windows
Загрузочный раздел обычно существует в начале диска, перед системным разделом. Так не обязательно должно быть, но делается с целью ускорения запуска Windows. Чтобы UEFI быстрее нашла загрузчик. На SSD такая оптимизация вряд ли будет ощутимой, а вот в случае с HDD можно побороться пусть даже за толику производительности.
На борту LiveDisk Стрельца запускаем AOMEI Partition Assistant. Делаем клик на системном разделе, на боковой панели операций жмём «Изменение размера».
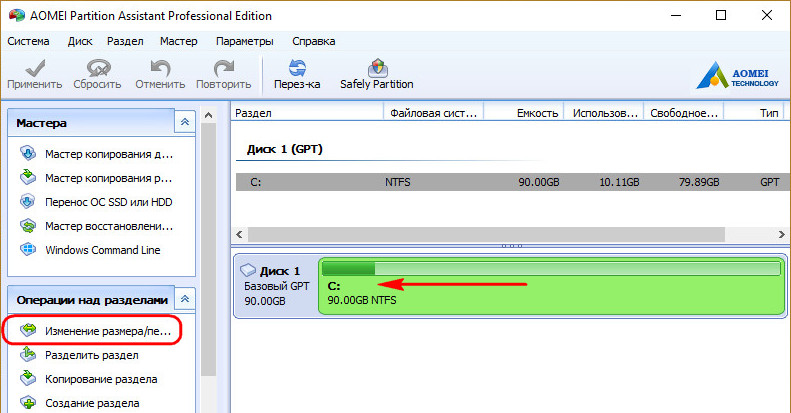
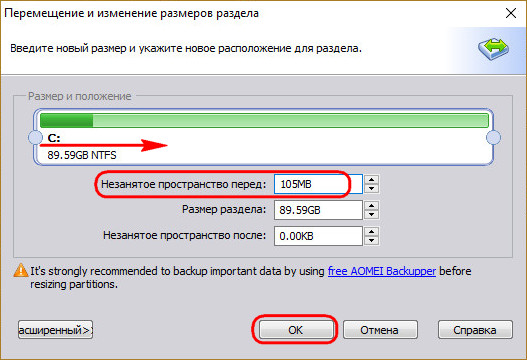
Немного оттягиваем ползунок на карте вправо, чтобы в графе ниже «Незанятое пространство перед» появилось несколько Мб. Далее вместо оттянутой цифры вписываем 105. Чтобы получилось 105 Мб. Жмём «Ок».
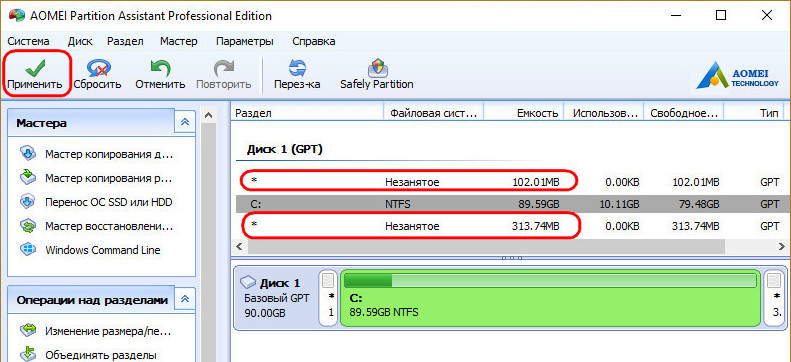
В итоге программа высвободит корректное значение дискового пространства, в нашем случае 102,01 Мб. И оставит небольшой хвост сзади раздела. Жмём «Применить».
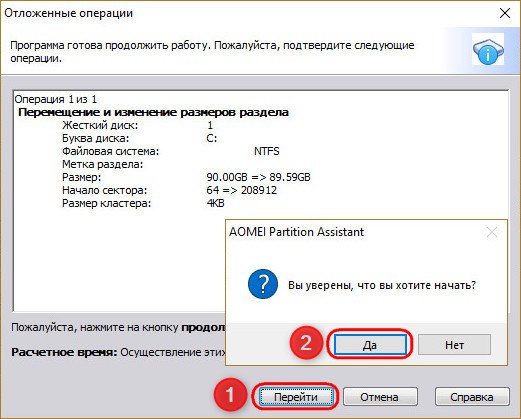
Подтверждаем.
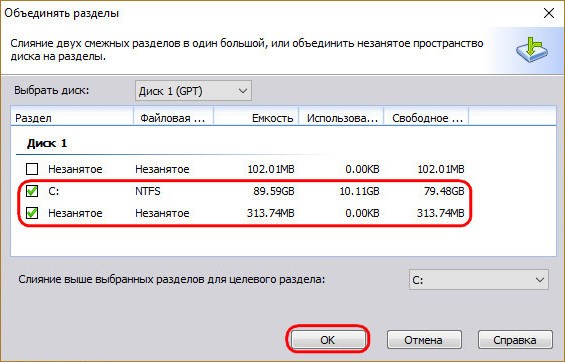
Далее можем присоединить хвост к разделу.

Теперь запускаем командную строку. И создаём EFI-раздел точно так же, как описано в п.1 статьи.
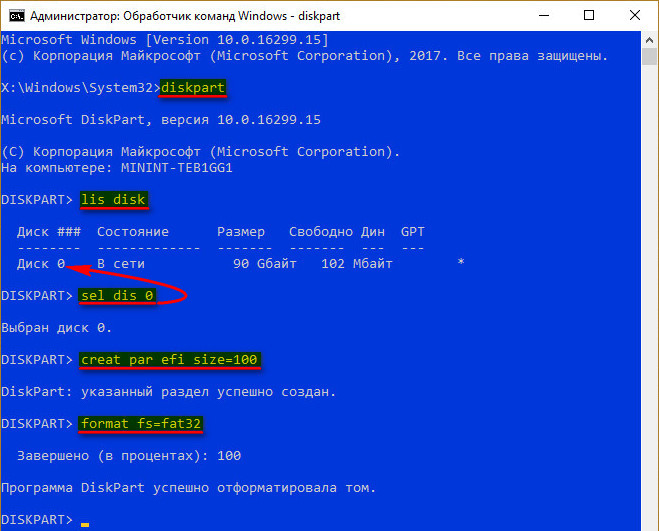
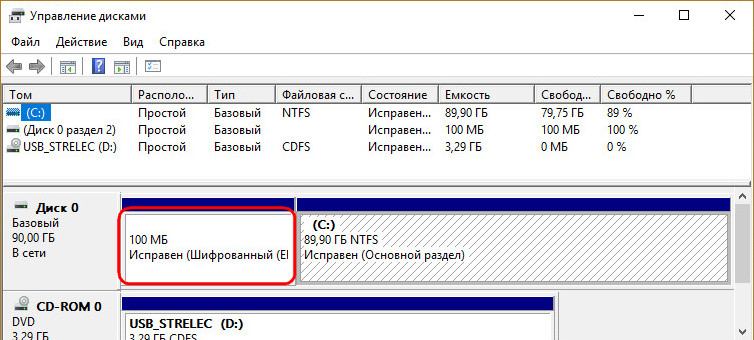
Вот EFI-раздел создан.
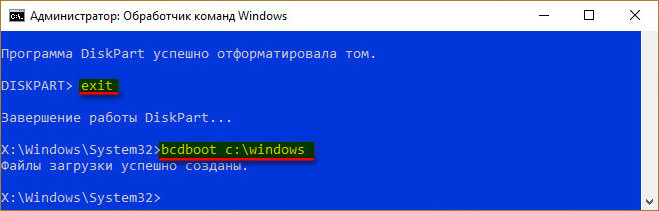
Осталось только пересоздать загрузчик, как описано в конце п.3 статьи.
MBR и GPT разделы – файловая система
Раздел – это логическое выделение блоков хранения, которое рассматривается операционной системой и управляется как автономный блок.
На одном устройстве вы можете иметь основной и расширенный разделы: первый необходим для установки операционных систем Windows; последний может содержать несколько логических разделов. Системы Linux могут быть установлены как на первичном, так и на логическом разделах.
В статье различия между MBR и GPT мы уже подчеркнули разницу между «историческими» разделами MBR (Master Boot Record) и самыми последними разделами GPT (GUID Partition Table). Последние обычно используются на самых современных системах и на машинах с UEFI BIOS (см. что такое UEFI и как работает BIOS).
Если кратко, по сравнению с разделами MBR, GPT позволяет преодолеть их ограничения (в частности, максимальный размер 2 терабайта, налагаемый MBR), позволяет создавать практически неограниченное количество разделов (хотя Microsoft, как подтверждается в этом документе, поддерживает до 128) и он более надежен, поскольку хранит информацию о структуре диска в нескольких местах памяти (в начале и в конце устройства, чтобы избежать невозможности запуска системы в самых критических ситуациях).
Поэтому сейчас предпочтение отдается использованию GPT, особенно если вы используете большие жесткие диски (емкостью более 2 ТБ), а также для использования избыточности информации, относящейся к структуре устройства.
Чтобы проверить, были ли используемые диски (жесткий диск и твердотельный накопитель) настроены на MBR или GPT, просто откройте окно «Управление дисками», затем щелкните правой кнопкой мыши по полям («Диск 0», «Диск 1» и т.д.), наконец, выберите Свойства.
Не щелкайте правой кнопкой мыши по разделам, показанным справа, или по любому нераспределенному пространству, потому что при этом не будет найдена информация, которую вы ищете.
На вкладке Тома в пункте «Стиль раздела» вы найдёте информацию об используемой таблице – GPT или MBR.
Или просто откройте командную строку с правами администратора, затем введите diskpart, затем list disk.
Звездочка в столбце GPT указывает на использование стиля GPT. Если в столбце «Свободно» отображается 0 или значение, близкое к нулю, это означает, что все пространство устройства было выделено и занято разделами, а не то, что больше нет свободного места для хранения файлов.
Чтобы преобразовать раздел MBR в GPT с Windows 10, вы можете использовать утилиту Microsoft mbr2gpt и две следующие команды:
mbr2gpt /validate /disk:N mbr2gpt /convert /disk:N
Вместо «N» должен быть указан идентификационный номер, соответствующий преобразовываемому разделу (вторая команда должна запускаться, только если первая завершает операцию проверки, не сигнализируя о каких-либо проблемах).
В случае устройств, содержащих операционные системы и участвующих в процессе загрузки компьютера, необходимо будет соответствующим образом перенастроить BIOS UEFI.
Для преобразования раздела GPT в MBR, с другой стороны, вы можете использовать diskpart, набрав команду select disk N (заменяя, как обычно, идентификационный номер раздела), а затем convert mbr.
Создание одного или нескольких разделов недостаточно для подготовки диска к приёму данных: необходимо отформатировать их с использованием файловых систем, совместимых с операционными системами, которые вы собираетесь использовать.
При установке новой операционной системы процедура обычно включает настройку жесткого диска или твердотельного накопителя путём создания необходимых разделов и их соответствующего форматирования. Однако, существуют случаи, когда вы не можете установить операционную систему после появления ошибки, относящейся к структуре диска.
How to open Diskpart in Windows 7?
Situation1: If you can boot into Windows 7 system, you can open
Diskpart by clicking Start, type cmd at the search
box. Then, right click the cmd progress, select Run as
Administrator. In the command prompt, type diskpart,
press Enter to open it.
If you cannot boot into Windows 7, you can access Diskpart with a Windows 7
installation disc:
1. Insert the disc to your computer and restart your computer, press any key to
boot from the installation disc.
2. Select your prefered language, time and keyboard, click Next. It will show
you the Windows 7 install interface. Click Repair your computer here.
3. select the operating system from the list, and click Next.
4. Select Command Prompt in the following screenshot.
5. Type diskpart and press Enter.
Situation2: If you do not have Windows 7 installation disc, you
can take use of System Recovery Options installed on the hard drive to access
Diskpart.
1. Restart the computer. PressF8 as the computer start to
boot until the Advanced Boot Options screen display.
2. Select Repair Your Computer here. Press Enter.
3. You will get into the System Recovery Options window, select Command
Prompt, type diskpart, press Enter. Then, you can open Windows 7
Diskpart without installation disc.
Then, you can use Diskpart to
format partition, create partition, delete partition, etc. Here is an example of
how to partition hard drive in Windows preinstallation environment.
Format disk partition with gui
The truth is that not everybody likes to use command prompt to format disk partition. For those people, format partition with GUI instead of DiskPart format is a greater choice. The AOMEI Partition Assistant Standard provides the easiest UI to format the partition free. With it, you can format disk partition with only few clicks. Here you can do as following steps:
Step1.Free download AOMEI Partition Assistant Standard, install and launch it, and you can see the main interface of your disk(s). Select the partition you want to format, right click on it, select «Format Partition» in the pop-up menu.
Step2. Here you can give a partition label and format the partition to what kind of file systems. Click OK.
Step3. Finally, click Apply at the toolbar to execute all operations.
Solution 3 — Extend volume on Windows 10 with 3 freeware
When you fail to expand size of disk volume on Windows 10 by running Diskpart command, you have another choice to perform partition resizing, namely partition software.
#1 Freeware — IM-Magic Partition Resizer Free is a completely free partition tool which enables you to increase size of system partition and data partition on Windows 10. It supports both NTFS file system and FAT32 file system. This partition software also allows you to shrink volume, move volume, format volume, delete volume and so on.
More video tutorials are on https://www.resize-c.com/video/
Download IM-Magic Partition Resizer Free Edition
#2 Freeware — Easeus Partition Master Free
Easeus Partition Master Free provides free disk management for users to resize, move, copy, convert disk partitions with easy to use interface. The free version is for home use.
#3 Freeware — Macrorit Partition Expert Free
Macrorit Partition Expert Free is yet another useful disk management tools that provides easy to use disk partitioning functions not limited to move partition, copy partitions, deleted partitions etc.
Параметр create volume stripe
Создание чередующегося тома на указанных дисках. После создания тома фокус автоматически переносится на этот том.Синтаксис:
- — Объем дискового пространства в мегабайтах (Мбайт), который том будет занимать на каждом диске. Если размер не задан, новый том занимает все свободное пространство на самом маленьком диске и равный объем на каждом последующем диске
- — Динамические диски, на которых создается том. На каждом диске выделяется объем, равный значению size=n
- — Только для сценариев. Если задан этот параметр, при возникновении ошибки программа DiskPart продолжает обрабатывать команды, как если бы ошибки не было. Если параметр noerr не задан, при возникновении ошибки работа программы DiskPart завершается и выдается код ошибки
Other ways to format disk partition
DiskPart should be the best way to format disk partition, and it is widely used in
Windows Vista/7/8/8.1/10, however, it doesn’t support Windows XP. If you are
using XP, how do you manage disks with command line? Besides, if you use DiskPart to
format partition installed with system files, you may be failed and receive an Windows error code 0x80070057, what would you do?
Fortunately, there are many other ways to instead of DiskPart format disk partition.
Format disk partition with AOMEI Partition Assistant command line
AOMEI Partition Assistant Professional is a
great tool that can help you format partition with command line in a quick way.
First, you need to open the command prompt by clicking Start->type cmd, right click the program->select Run as
Administrator. If you work with Windows 10, pressWin+X, select Command Prompt (Admin).
Then, you can follow the next content to format a drive with AOMEI Partition
Assistant.
1). Type cd C:\Program Files\AOMEI Partition Assistant Pro Edition
6.3, press Enter. The path is your AOMEI Partition
Assistant installation directory. Then, type partassist.exe
/list, press Enter.
2). It will skip to the AOMEI Partition Assistant command Prompt, and list all disks
on your computer.
3). Typepartassist.exe /list:0, the 0 refers to the disk
you want to list volumes on it. Press Enter.
4). It will show you a new window to list the volumes on the disk 0.
5). Type partassist.exe
/fmt:E /fs:ntfs /label:Play to format the FAT32 to NTFS.
Press Enter.
6). Wait till the task done.
Notes:
-
«/fmt»
followed by partition number or drive letter, and the partition number
starts with 0. If the specified value is drive letter, disk number can
be ignored. -
«/fs» means file system, whose value can be fat16, fat32 or
ntfs. -
«/label» means you can add any name of the partition.
Format disk partition with GUI
The truth is that not everybody likes to use command prompt to format disk partition. For those people, format partition with GUI instead of DiskPart format is
a greater choice. The AOMEI Partition Assistant Standard provides the easiest UI to format the partition free. With it, you can format disk partition with only few clicks. Here you can do
as following steps:
Step1. Free download AOMEI Partition Assistant Standard, install and launch it, and you can
see the main interface of your disk(s). Select the partition you want to format,
right click on it, select «Format Partition» in the
pop-up menu.
Step2. Here you can give a partition label and format the partition
to what kind of file systems. Click OK.
Step3. Finally, click Apply at the toolbar to
execute all operations.
You can format every partition on your hard drive. Or you can initialize disk directly. Both of
them will delete the data on the hard drive, so if there are some important data
stored on your hard drive, please backup them first. You also can create a WinPE bootable usb to format disk partition with AOMEI Partition Assistant. It
should be the best way to replace DiskPart format disk partition.
How to Convert Logical Partition to Primary with MiniTool Partition Wizard?
MiniTool Partition Wizard is a professional partition management software, which could organize your hard drive and gain additional space in your existing partitions to maximize usage of hard disk space. It helps you to create, delete, merge, split and convert partitions as well as helps you to perform a variety of other partitioning operations.
Using MiniTool Partition wizard to convert logical partition to primary is very convenient and effortless. If you want to convert logical partition to primary easily and quickly, MiniTool partition wizard is exactly what you need.
Step 1. Download MiniTool Partition Wizard and launch it to get its main interface.

Step 2. Choose the partition that you want to convert, and click Set Partition as Primary.

Step 3. Click Apply on the upper left corner to execute the operation.

Step 4. After the process is done, you will find the logical partition has been converted to primary partition.
Attention:
- You are unable to convert logical drive to primary if you already have 3 primary partitions and more than one logical partition on the disk as an MBR disk can support at most 4 primary partitions or 3 primary partitions and 1 extended partition.
- Even though there is 1 or 2 primary partitions, you are still unable to convert a logical partition to primary if the adjacent partitions of this logical partition are both logical partitions. As you know, an MBR disk can support up to one extended partition. If you convert the logical partition to primary, there would be 2 extended partitions on the disk, which is not allowed for an MBR disk.
- You may also convert MBR disk to GPT disk. By using MiniTool Partition Wizard, you may convert an MBR disk to GPT with just a few clicks. But if you want to boot from the GPT disk successfully, UEFI mode should be supported and enabled.
How to create partition using DiskPart?
DiskPart is a disk partition management command line tool that is
built-in all Windows versions, such as Windows 10, Windows 8, Windows 7.
You can use DiskPart to create primary/logical/extended partitions on
GPT and MBR disks in your computer. Using the command-line can totally
replace the Windows interface. DiskPart provides three types of create partition, so
it has three different commands.
1. First, open a Command Prompt by clicking Start -> All programs ->Accessories -> Command prompt, or pressing «WIN+R» and typing «cmd».
Type: diskpart.
2. At the DiskPart prompt, type: list disk
All the disks in current system will be listed so that you know the disk number on
which you want to create a partition.
3. Type: select disk n
n means the number of the disk. To create a partition, please make sure there is
unallocated space on the disk you select.
4. After selecting the disk, type one of the following command according to your
requirements.
create partition primary
or
create partition extended
or
create partition logical
5. Type: assign letter=H
Assign drive
letter can give the partition a name.
For example, how to use DiskPart to create primary partition? You can refer to the
following example.
You can change the step4’s command to create other types of partition. for
example, if you want to use DiskPart to create extended logical partition, change
command in Step4. Is DiskPart the only way to create partition? No!