Бездисковая загрузка по технологии iscsi на базе ос windows
Содержание:
- Install TFTP Client on Windows 10
- Configuring Firewall to Allow TFTP
- Setting up the TFTP Client
- Authentication
- ⚡ What is TFTP used for?
- Tftp сервер windows
- [edit] General
- Best TFTP server
- Multicasting
- Install TFTP Server Windows
- Making local changes
- Final Words
- ❓ What is TFTP Server?
- WinAgents TFTP Server
- TFTP Desktop
- Transfer File with TFTP Client
- haneWin TFTP Server
- Test Windows TFTP Client on Windows 10 or any Other Versions
- [edit] Windows
Install TFTP Client on Windows 10
1) Make sure that you have administrative access to enable the feature.
2) Go to Control panel and click on ‘Programs & Features’
3) Click on ‘Turn Windows features on or off’ then tick the ‘TFTP Client’ as shown below.
4) Press OK and wait for the installation to complete.
How to Verify that Windows TFTP Client Installed Successfully?
TFTP client is like telnet client when the feature has not installed the commands will return unknown command error.
For example, before installing the TFTP client, if you open a command prompt and type ‘tftp’, it will return the below message.
When it is installed, the same command will give the below output.
That was the clear indication that Windows TFTP client is installed on your computer.
Configuring Firewall to Allow TFTP
Before using the TFTP client, you will need to turn off the Windows Firewall or configure the Firewall to allow the inbound/outbound transfer of files using the TFTP client.
You can follow the below steps to add an exception for the TFTP connections:
1. Go to the Start Menu and open the Control Panel as shown below:
2. Click on the Windows Firewall to open the firewall as shown below:
3. In the left-pane, click on the “Allow an app or feature through Windows Firewall“.
You should see the following page:
4. Click on the Allow an app or feature through Windows Firewall at the bottom. You should see the following page:
5. Click on the Browse button and specify the TFTP.EXE path and click on the Add button.
You should see the following page:
6. You should see that the Trivial File Transfer Protocol App should be highlighted.
7. Now, click on the OK button to finish the process.
At this point, your client computer is configured to allow PUT and GET command against your TFTP server.
Setting up the TFTP Client
The TFTP Client depends on the successful installation and configuration of the TFTP server. The client is probably the one that you will be using the most.
The only task you might need to do with the server is to update the shared files and input/remove some IPs.
When using the TFTP server, don’t forget about the following settings (already mentioned).
- The TFTP server service has to be up and the application is running.
- Configure the right TFTP folder.
- Make sure no Firewall and Antivirus is blocking the application and connection.
- If you are file sharing to a remote location, don’t forget about port forwarding.
- Make sure all your TFTP clients can reach your TFTP server.
From the TFTP client
Most networking devices already have TFTP enabled. For example, to transfer a Cisco Switch image from the server to the device, you would have to specify the IP address of the TFTP server on the client (Cisco Switch).
As you can see from the screenshot below, this switch does not have any configuration or image filename.
It does have a default address and a TFTP address. So to receive these missing files, you can use the IOS command “copy tftp startup-config ”.
Another example, from a Huawei Switch (screenshot below).
The first line (TFTP get) downloads the files from the TFTP Server (192.168.0.2) to the switch.
The second line (TFTP put) uploads the files from the switch device to the TFTP server.
But networking devices are not the only ones that can run TFTP clients. You can also run the client on a Windows system.
Authentication
TFTP has no session control and you cannot «log in» onto a TFTP server. Traditionally,
files on a TFTP server can be accessed without password. Several Linksys routers
(e.g. WAG54G) use TFTP for updating firmware. To make sure that not anyone can do this,
Linksys made a minor adjustment to the protocol in which the initial transfer request
holds a password (in addition to the filename and the file mode).
Simply adding a password string to the TFTP read or write request has two problems.
Since the password is sent in clear-text it can easily be sniffed. A worse problem
is that this choice breaks option negotiation
(RFC 2347).
I feel that the password should be added to the request as an option, so that it
does not break option negotiation. There is no easy solution to avoid sniffing
the password, since the option negotiation must be initiated by the client and
it is just a two-way handshake. A full challenge-handshake protocol cannot be
built with TFTP option negotiation.
I propose the option «password» with a zero-terminated string as the parameter.
In case a user name and a password must be sent, these can be combined in the
string with a colon (or another «special» character) separating the user name
and the password. For example, in the parameter «thiadmer:secret», «thiadmer»
would be the user name and «secret» the password.
⚡ What is TFTP used for?
TFTP is widely used to transfer small files across LAN networks using UDP. It does not require much in the network resources. It is relatively easy to send files or firmware updates to devices throughout the network. Moreover, for conserving network resources, it makes it much easier to update device and firmware.
When you update the firmware of thousands of different devices on regularly it is not very efficient. A TFTP server also helps you to push firmware updates straight to these devices from a centralized location which means that you don’t require spending hours carrying out one task because you can use TFTP to automate the entire process.
Tftp сервер windows
Для того, чтобы развернуть сервер на своем рабочем месте необходимо:
Загрузить нужный дистрибутив отсюда
Стоит обратить внимание, что дистрибутивы различаются по типу запуска: как службу (service edition) и как приложение (standard edition) и также по битности ОС. Для себя я выбрал пакет tftpd64 service edition (installer)
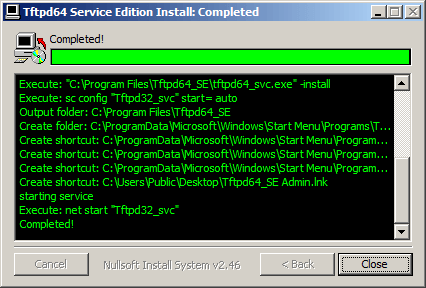
После загрузки, устанавливаем загруженный дистрибутив, не изменяя абсолютно никаких параметров
Если Вы загрузили, как и я, дистрибутив с запуском в качестве службы, то стоит вручную запустить службу или просто перезапустить компьютер.
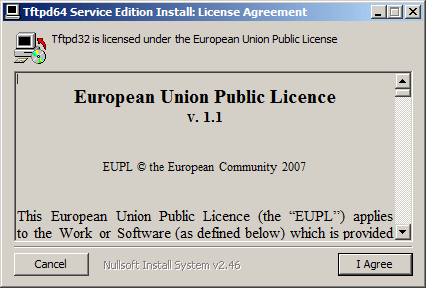
далее жмем i Agree и соглашаемся с лицензионным соглашением.
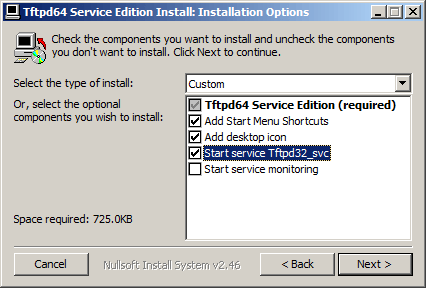
Выставляем нужный птички и жмем next.
Как установить tftp сервер на примере tftpd64 service edition-03
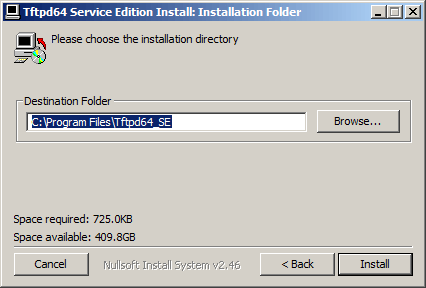
Задаем при необходимости альтернативный каталог для установки.
Как установить tftp сервер на примере tftpd64 service edition-04
Как установить tftp сервер на примере tftpd64 service edition-05
Как установить tftp сервер на примере tftpd64 service edition-06
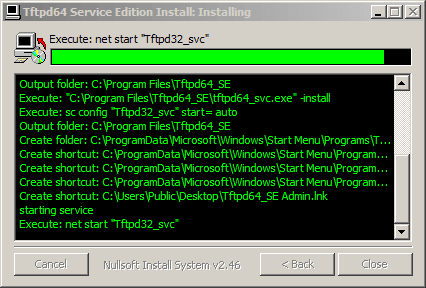
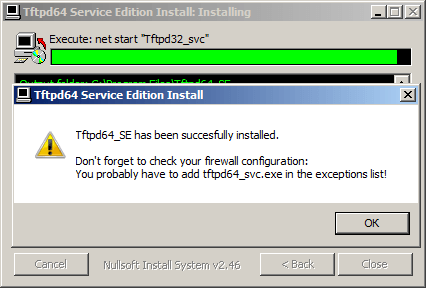
Не забудьте проверить что открыт TCP, UPD порт 69.
Как установить tftp сервер на примере tftpd64 service edition-07
Открываем установленную программу и нажимаем снизу Settings
Как установить tftp сервер на примере tftpd64 service edition-08
Оставляем галку TFTP Server
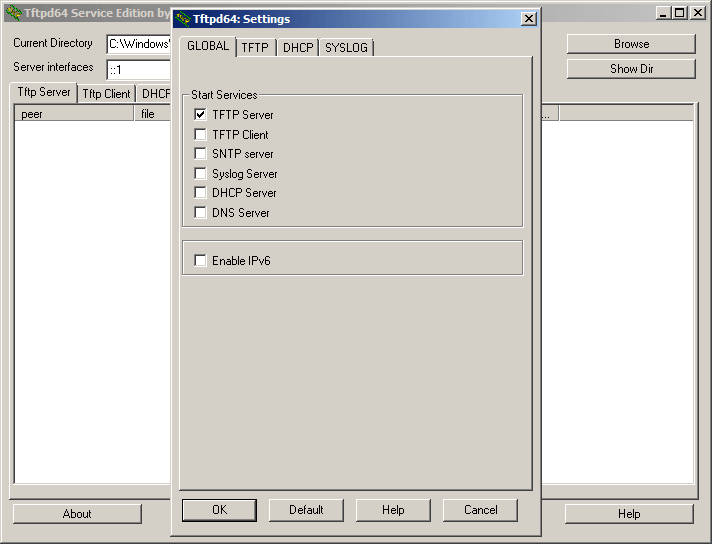
Как установить tftp сервер на примере tftpd64 service edition-09
Переходим на вкладку TFTP и нажимаем Browse
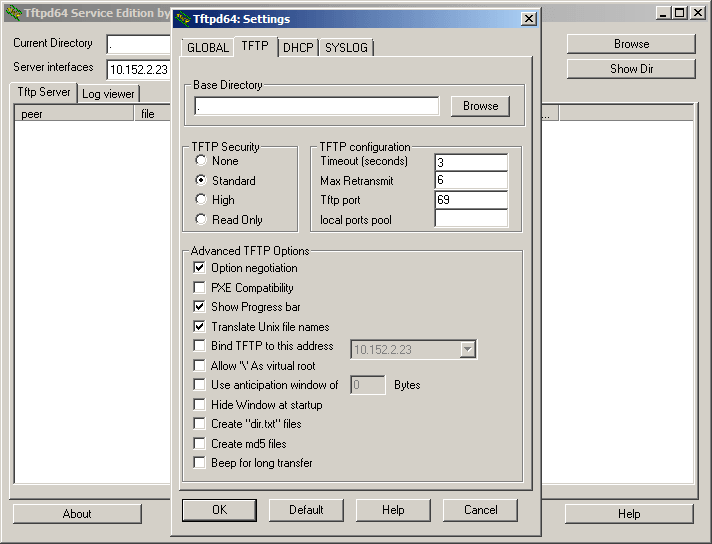
Как установить tftp сервер на примере tftpd64 service edition-10
Указываем папку где у вас будет ссылка на папку tftp
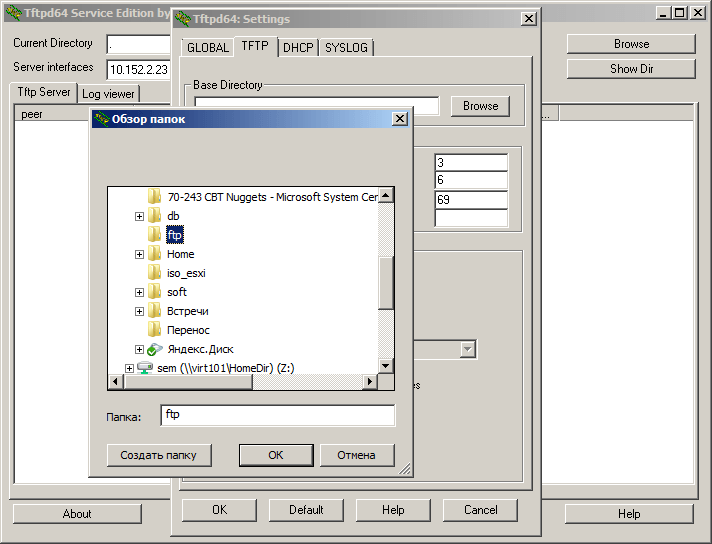
Как установить tftp сервер на примере tftpd64 service edition-11
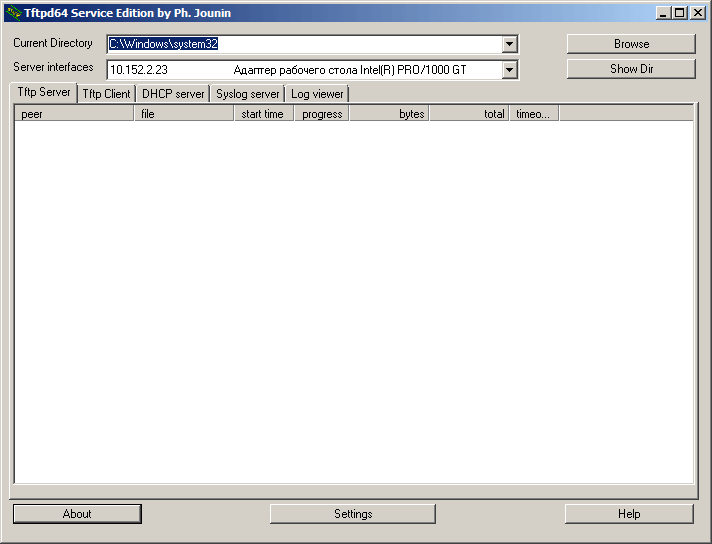
Закрываем, у вас должно получиться нечто подобное
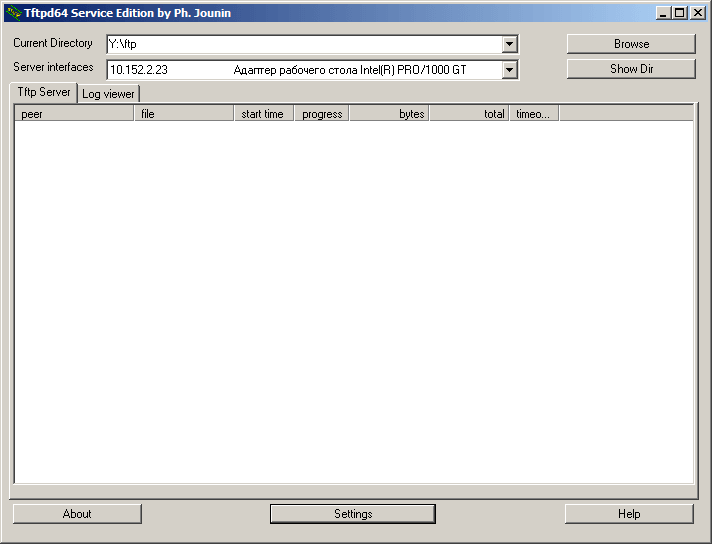
Как установить tftp сервер на примере tftpd64 service edition-12
Всё! Теперь можно подключаться к серверу и копировать файлы. У операционной системы Windows XP tftp-клиент установлен по умолчанию, а у Windows server 2008R2 его необходимо доставить, я описал это тут (Как установить tftp клиента в Windows Server 2008R2)
[edit] General
This article describes how to do an initial flash or a TFTP recovery flash for your device.
- Unplug the router, get a for the PC, and connect it via network cable to a router LAN port
- Set a fixed IP address on the PC with the same network as your router, e.g. Router: 192.168.1.1, PC: 192.168.1.2
- Setup the TFTP client, then start a continuous ping (-t switch is needed for this in Windows) to the router
- Plug in the router and start the TFTP client as soon as there is a TTL=100 ping response. The client should show transfer.
- TTL=64 means application code has been reached. If the router isn’t responding, it is soft-bricked (use OEM firmware)
- Read about timing problems below:
Special Asus TFTP Flashing Procedures
Some routers like the Asus WL-500xx series (WL-500G, WL-500G Premium, WL-500W, WL-500G Deluxe), need additional steps to perform a complete and proper initial flash. See this wiki page: Asus TFTP Flash
Special for Vista, Win7 and Win 2008
In order to catch the narrow window for TFTP flash, you should use platforms with simple TCP/IP implementations that don’t have CTCP implemented: Windows XP or Linux are reported to work, but some have reported significant problems with Vista, Windows 7 or Windows 2008.
For more information see this posting
Edit: While some may have reported problems, CTCP is definitely not the issue, because it is disabled by default in Windows Vista and Windows 7. So unless people are specifically turning it on, it isn’t running. I personally just used TFTP on my router with no difficulties, although mine is a Netgear WNDR3700 that was waiting for a TFTP flash and didn’t have this race condition at boot as some of these routers seem to. But again, even if you have an issue it’s not CTCP. Check out the wikipedia article on CTCP for information on how to check if it is running and how to disable it (both are simple command line entries).
If having issues, try connecting a separate network switch between the PC and router, so the PC network port sees a connection before the router port is up. This should allow for a faster ping reply. Then follow the instructions as normal.
Special for Linksys WRT54GL Users
If the router seems to be bricked so that the power light is constantly blinking and pinging the router results in TLL=100 continuously, then there is still a great chance that tftp can help.
Firstly you must flash the router with the original firmware available at Linksys homepage www.linksys.com, since flashing it with DD-WRT probably won’t give any result at all. Then do a 30/30/30 and after that you can flash with DD-WRT Mini. The initial flashing can be done with only the mini version, perhaps later you can move on to bigger versions of it.
Best TFTP server
| Name | IPv4/IPv6 | File Size Limit | Link |
|---|---|---|---|
| SolarWinds Free TFTP server | IPv4 | 4 GB | Learn More |
| Spiceworks TFTP server | IPv4 | 33 MB | Learn More |
| Progress WhatsUp TFTP Server | IPv4 | 4 GB | Learn More |
1) SolarWinds Free TFTP server
SolarWinds provides a free TFTP server for Windows that offers basic functionalities like IP-range lockdown, etc. It can transfer files up to 4GB in size. This server management service is easier to manage with native Windows tools.
Key Features:
- Suitable for transferring device configuration images
- Communicates with several devices simultaneously
- It offers concurrent transfers from multiple devices and runs as a Windows service.
- Let’s you authorize a specific IP address or a range of IPs altogether.
- Easy to use TFTP software with backup network devices and configurations.
- Offers highly scalable multi-user administration and advanced device config backup.
- Free TFTP server which runs on Windows easily

2) Spiceworks TFTP server
Spiceworks is a complete IT management tool that provides its users with free TFTP servers to make their work easy.
This TFTP software is one of the best TFTP servers developed for IT professionals to track their network device config. It also enables you to backup and view all your config in one place.
Features
- Allows you to compare current network configration with backups.
- These TFTP servers can be used for configuration image transfers
- Helps you to push out firmware updates in the background.
- Free and in-built features of Spiceworks.
Link: https://www.spiceworks.com/free-tftp-server-for-network-configuration-management/
3) Progress WhatsUp TFTP Server
WhatsUp Gold is one of the best TFTP servers, which helps save you time while doing networking. This service-based tool allows you to securely transfer files across the network.
Features:
- It offers a simple transfer of system configuration.
- Sturdy, clean, and attractive GUI based interface.
- It helps you to save time and effort when uploading and downloading the file.
- Compatible with the older versions of Windows such as XP, Vista, and others.
Link:https://www.whatsupgold.com/free-network-monitoring-tools/free-tftp-server
4) TFTP Desktop Server
TFTP desktop server is the best solution for updating routers, OS, image transfer, and remote booting. It also allows you to configure multiple devices in a single network.
Features:
- Real-time TFTP graph transfer helps you to work across the network.
- Unlimited file sizes: no 16/32MB file size limitation
- Graphs TFTP transfers in real-time
- Directory and IP address-based security
- Secured and locked TFTP root folder
- It offers security based on the directory as well as the IP address.
- Extremely fast file transfers
Link:https://tftp-desktop-server.apponic.com/
5) WinAGents
WinAgents provides a fully recognized TFTP server. It is a specially built tool to work consistently in the background. It helps you to create stock copies of different data like flash images, config files, and device settings in case of an emergency.
Features:
- Offers virtual TFTP folders, servers, and graphic utilities for status control.
- Offers highly scalable server architecture that has a built-in cache system and remote server administration.
- It helps you to set different access rights for various folders.
- It provides an option for setting the highest precedence for the server process
- Provide IP based access control
- File transmission using firewalls, and high precedence for a server process.
Link:https://www.winagents.com/en/products/tftp-server/
6) atftpd
ATFTPD is a Windows TFTF server that is widely used in various types of networks. It offers multithreaded and multicast architecture.
Features:
- Full TFTP options support with high compatibility options.
- It also supports PXE or MTFTP specifications.
- Provides fast servers to make your packages search as fast as possible.
- It helps you to replace the requested filename with the new one.
- Allows users to restrict accessing the untrusted hosts.
- Free TFTP Server for Linux.
Link: https://pkgs.org/download/atftpd
7) haneWIN TFTP server
haneWIN TFTP is a multithreaded server-based and fully realizable TFTP server for all versions of Windows. This TFTP server for Windows helps you to achieve maximum reliability and high performance while transferring the data.
Features:
- Implemented as a Windows service and also supports all types of Windows versions.
- This TFTP server for Windows includes an intuitive control panel for accessing all services.
- Offers multithreaded architecture for high performance, security, and reliability as well.
- It helps you to receive data directly into another application using a pipe option.
Link: https://www.hanewin.net/tftp-e.htm
Multicasting
In multicast mode, a single data stream is received by multiple hosts. Standard
connections («unicast») require a separate connection for each data stream going
out of the server, but a multicast transfer needs only a single connection.
Multicasting therefore reduces the load at the server and increases the network
efficiency.
There exist two proposals for multicast TFTP: RFC 2090
and mTFTP defined in the Intel PXE specification. RFC 2090 is a fairly complex
protocol if implemented in full at both the client and the server. PXE’s mTFTP
is much simpler, but it has important limitations:
- No option negotiation is possible.
-
The client cannot ask for a specific file, it will always receive a particular
file from the server (the PXE specification suggests to use a different multicast
IP address for every file). -
When the «master client» disappears, the other clients are not signalled, meaning
that another client will only restart the transfer (and become the new master
client) after a time-out —which may be quite long.
The master client is the client that sends the acknowledgements: in a multicast
situation, several hosts receive the same data packets from a server, but only
one of these may (and must) answer.
The complexity of RFC 2090 lies in the ways that it implements partial transfers.
According to the RFC, each client should maintain a list of packets that it
has received and (if it is selected by the server as the «master client») ask the
server for the packets that it still lacks. A mTFTP client/server will always
restart the transfer with the first block, and therefore a client only has to
remember the first block number that it received. An RFC 2090 client can be
simplified accordingly (without needing to change the protocol): instead of a
map of all received packets, let it just remember a single span of consecutive
packets. Any received series packet that expands this range is accepted. Any
series of received packets that lies outside the span is ignored.
For example, assume that a client drops into an existing stream and it sees the
packets 683 to 1254 pass by. It can determine whether that last packet (1254) marks
the end of the file, by checking whether that packet is a full data block.
A next sequence of packets from 1 to 200 would be ignored, but if the client
receives packets 500 to 700, it will accept 500 to 682 and update its span to
500 .. 1254. When the client becomes the master client before seeing a complete
file, it asks the server for at most two sequences: from packet 1 to the start
of its span and from the end of its span to the end of the file.
Neither type of multicast TFTP works well with block counter roll-over. Since
mTFTP does not support option negotiation at all, data transfers are limited to
32 MiB (minus 512 bytes). A multicast TFTP host implementing RFC 2090 could
negotiate larger block sizes and it could be extended to handle the proposed
(non-standard) «toffset» option.
Install TFTP Server Windows
First, you will need to download the SolarWinds TFTP server from their download page:
Once downloaded, extract the downloaded file and double click on the installer to start the installation, you should see the following screen:
Click on the Next button.
You will be redirected to the License agreement page as shown below:
Accept the License agreement and click on the Next button.
You will be asked to provide the location of the TFTP server as shown below:
Click on the Next button to continue with the default location.
You should see the following page:
Click on the Finish button to complete the installation.
After installing the TFTP server, you will need to configure it.
You can follow the below steps to configure the TFTP server:
Making local changes
You need to edit these files from the new location after you’ve copied and renamed them, to add some additional parameters. Here is what the tftp-server.service file initially looks like:
Make the following changes to the section:
Make the following changes to the ExecStart line:
Here are what the options mean:
- The -c option allows new files to be created.
- The -p option is used to have no additional permissions checks performed above the normal system-provided access controls.
- The-s option is recommended for security as well as compatibility with some boot ROMs which cannot be easily made to include a directory name in its request.
The default upload/download location for transferring the files is /var/lib/tftpboot.
Next, make the following changes to the section:
Don’t forget to save your changes!
Here is the completed /etc/systemd/system/tftp-server.service file:
Final Words
TFTP is a terrific and often misunderstood transferring method.
Although it has a bad reputation for its lack of security, it doesn’t have much overhead, making it a reliable, quick, and easy transferring mechanism.
You can use it in enclosed LANs or WANs, where speed reigns over security.
Setting up a TFTP server on Windows 10 is straightforward. Just download Solarwinds TFTP Server and configure it, as shown in this tutorial.
If your TFTP client is a networking device, it will likely have the TFTP service already enabled. But if you want to transfer files to a Windows 10 workstation, you can enable the TFTP built-in feature.
We hope that this tutorial was informative.
Please comment if you have any questions about the setup and configuration of the TFTP on your Windows 10.
❓ What is TFTP Server?
Trivial File Transfer Protocol (TFTP) is used for small file transfers and does not require any authentication. TFTP is helps you to transfer files, backup network, and boot PCs without a disk. It uses UDP, which does not have error checking as TCP does. TFTP servers are mostly used in devices like mobile phones and routers.
Moreover, the implementation of the TFTP protocol is applied when there is no security and authentication needed. So, TFTP is hardly exercised in a computer network, as it lacks security, which makes it vulnerable.
You are likely to encounter TFTP servers on Linux, but sometimes you will find it on Windows and Mac as well. One major drawback of TFTP is that it does not have any access privileges in place.
Therefore, you access a TFTP server only if you are not using an external firewall or another third-party device which makes it less secure than other protocols like FTP and SCP.
WinAgents TFTP Server
WinAgents Software Group offers free downloads of their TFTP Server. It’s a legacy software designed to run on Windows 2000, 2003, Vista, and 7, which makes it useful if you work with these older OSes on your network. It can probably work with Windows 10 as well, you just need to try it.
WinAgents TFTP Server operates as a background service and implements an IP-based access control model for some kind of network security.
It also supports sending files through firewalls by configuring a UDP port for the connections. Administrators who manage large intranets or remote sites will find the remote configuration features helpful. The cache system makes the system highly scalable compared to other free TFTP tools.
TFTP Desktop
Not all the TFTP servers are designed specifically for network administrators handling hundreds of workstations and routers on an intranet.
TFTP Desktop is a consumer app made for situations that can arise on home networks. It was released during the Windows 7 era and hasn’t received an update, so it’s limited to running on pre-Windows 8 computers.
It does, however, support Windows 98, so if you have a legacy computer you keep as a home server, this program can run on it. It’s a free trial download on CNET that’s fully functional, which makes it ideal for fixing temporary problems like transfering large files between incompatible OSes.
Transfer File with TFTP Client
You are now ready to transfer file using the TFTP client.
Go to the TFTP client computer, open the command line interface and run the following command:
You should see all the options available with tftp command in the following page:
If you want to send a file to the TFTP server, use the following syntax:
For example, to send the file named testfile.txt located in Documents directory to the TFTP server run the following command:
Once the file transfers successfully, you should see the following output:
If you want to transfer file from the TFTP server to your local computer, use the following syntax:
For example, transfer the file named testfile.txt from the TFTP server to your local computer run the following command:
Once the file transfers successfully, you should see the following output:
Example Screen:
You can also transfer the files over the internet using the Public IP address of the TFTP server – Please remember, there is not encryption or any security when sending over the Internet!
haneWin TFTP Server
haneWin TFTP Server is a shareware offering for Windows. It supports both current and legacy Windows versions ranging from XP to Windows 10, and it can run as a service in the background on Windows 95/98/2000 without a user account logged in.
Data security options provided by haneWin include profiles based on the operation requested, IP address, and the file directories used by the server.
You can configure the server to transfer data through a range of UDP ports depending on your firewall settings and network traffic.
The client that comes with haneWin’s TFTP server is a Win32 console app that implements TFTP configurations in its command line options. For instance, you can set up a pipeline that will direct file transfers to other applications.
Test Windows TFTP Client on Windows 10 or any Other Versions
Let’s assume that the TFTP server setup appropriately is done and files are available at the correct location. Before you download a file from the TFTP server, you must know the right file name with the extension.
In this example, I’m going to download a file called ‘tftp.zip’ from the TFTP server 192.168.1.244.
Type the below command in command prompt (you must have a working network communication with the server, the ping command is handy to confirm the connectivity)
Tftp -i GET
The below message indicates that the file transfer is successful. The file will be downloaded at the location where you are executing the command. In this case, it is C:\Users\Dinesh folder.
To upload a file using the TFTP tool, use the following command.
Tftp -i PUT
The below command shows the successful file upload to the TFTP server by Windows TFTP client. The file will be uploaded to the root of the TFTP settings on the server. We do not have any option to select the location.
As I’m using the Solarwind TFTP server in this example, the above command uploaded the file to this root location.
There you go, we learned how to install the Windows built-in TFTP client on Windows 10 and how to ensure that is working fine. We showed the simple steps to upload and download a file using the TFTP client. By the way, this method is applicable for Windows 8.1 and server versions also.
[edit] Windows
Command Line
This example is after a bricked update, using a Belkin f5d130uk (which has a bootloader built in, no need for redboot)
ping the router permanently, by running in Start > Run:
ping -t 192.168.2.1 -t
and see if it is responding, e.g. like this
 64 bytes from 192.168.2.1: icmp_seq=1 ttl=64 time=2.90 ms
 64 bytes from 192.168.2.1: icmp_seq=2 ttl=64 time=0.264 ms
 64 bytes from 192.168.2.1: icmp_seq=3 ttl=64 time=1.44 ms
- reboot the router via web-if or powercycle (the ping response will stop)
- if you see the the first ping response again …
 From 192.168.2.1 icmp_seq=1 Destination Host Unreachable
 From 192.168.2.1 icmp_seq=2 Destination Host Unreachable
 64 bytes from 192.168.2.1: icmp_seq=3 ttl=128 time=2.90 ms
 64 bytes from 192.168.2.1: icmp_seq=4 ttl=128 time=3.50 ms
 64 bytes from 192.168.2.1: icmp_seq=5 ttl=128 time=0.90 ms
… you will have to start the tftp upload in binary mode immediately after the first pings responses. The TTL of the boot tftp server will be 100 or 128. It usually does 5 pings responses, after that it will boot the firmware in flash, this is the right time to flash (the TTL of DD-WRT is only 64). If the upload doesn’t work the first time, then you have to try the first steps again. you have to be very fast! 😉 Maybe you will have to reset the device via reset button a few times to get the tftp boot working (Siemens, Belkin and similar hardware).
tftp -i 192.168.2.1 put dd-wrt.vXX_XXX.XXX
- wait a few seconds (be patient! don’t reset the router! keep waiting!) when the upload is successful, change your computer’s IP address to 192.168.1.10, and the router will start responding at 192.168.1.1 with DD-WRT
- user name: root, password: admin
- always do a hardware factory reset after the successful flashing!
Linksys TFTP GUI
Linksys has a GUI flash utility
- Special for Vista, Win7 and Win 2008
- In order to catch the narrow window for TFTP flash, you should use platforms with simple TCP/IP implementations that don’t have CTCP implemented: Windows XP or Linux are reported to work, but some have reported significant problems with Vista, Win7 or W2K8.
- Set your computer hardware adapter to a static IP address within the same subnet as the router’s original firmware (ex…set a static of 192.168.11.10 if your router’s default IP address is 192.168.11.1). Set the net mask to 255.255.255.0.
- Start the TFTP utility.
- The Server/IP address is that of the router being flashed.
- Leave the password blank.
- Navigate and select the firmware you wish to flash.
- Set retries to 10.
- Now plug the ethernet cable from your computer into a LAN port of the router.
- Unplug the router, plug it back in, and immediately hit the Upgrade button on the TFTP utility.
- If the router does not flash immediately stop the attempts and vary the timing from when you plug the unit in to the time you hit the start button. I have had good luck flashing within the first 1/2 second of reapplying powering the device.
- Tip: ping the router continuously. Start > Run > ping -t 192.168.x.x -w 10. Power cycle the router (or tap the reset button) then press Upgrade as soon as you get the first ping reply.
- Once it flashes and you receive the Success message. Wait for a full 2 minutes while the new firmware flash configures itself. DO NOT power down the router!
- After the 2 minutes do a Hard reset or 30/30/30 on the router, then configure at 192.168.1.1 (DD-WRT’s default IP address). The default DD-WRT username/password is root/admin.