Media creation tool
Содержание:
- Как использовать Media Creation Tool для создания своего собственного установочного носителя Windows 10 на карте памяти USB
- Некоторые особенности работы
- How to use the Media Creation Tool to download an ISO file with the latest Windows 10 setup
- Use the Windows 10 Media Creation Tool to create a bootable USB memory stick with the Windows 10 setup
- Windows 10 Media Creation Tool FAQ
- Upgrade to Windows 11 using Media Creation Tool
- Download Windows 11 Media Creation Tool
- How to Upgrade or Get Windows 10 without Installation
- Новая материнская плата? Потеря Windows
- Результат
- Системные требования для установки Windows 10
- Download Windows 11 Media Creation Tool
- 4 Выборочная установка
- How to download the Windows 10 Media Creation Tool
- Выводы статьи
Как использовать Media Creation Tool для создания своего собственного установочного носителя Windows 10 на карте памяти USB
Вы также можете использовать Media Creation Tool в качестве USB-инструмента Windows 10, что означает, что он может помочь вам загрузить установочные файлы Windows 10 и автоматически создать загрузочную флешку Windows 10 USB, которую затем можно использовать для установки этой операционной системы на все ваши компьютеры
Обратите внимание, что вы должны войти в систему как администратор, чтобы запустить MediaCreationTool.exe. Когда Контроль учетных записей пользователей (UAC) спросит, уверены ли вы, что хотите запустить это приложение, нажмите или коснитесь Да
Затем Media Creation Tool загружает свой пользовательский интерфейс и просит вас принять его условия лицензии. Прочитайте условия и нажмите или нажмите кнопку «Принять», чтобы продолжить.
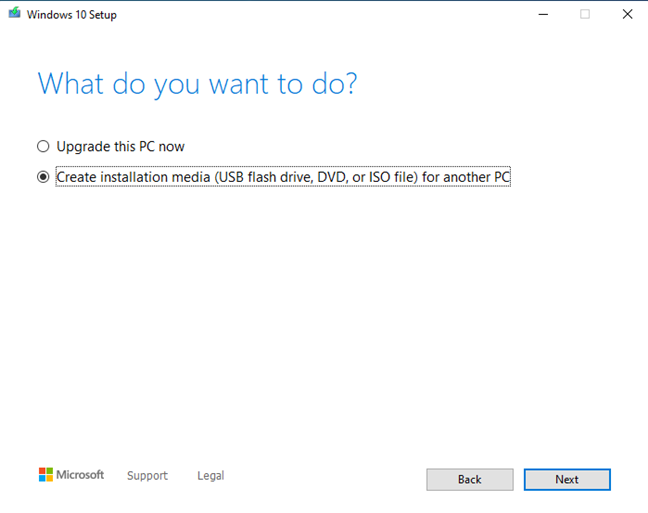
Инструменту создания мультимедиа требуется несколько секунд, чтобы «подготовить кое-что». Затем он спрашивает, хотите ли вы обновить компьютер или создать установочный носитель, который можно использовать для установки Windows 10 на любой компьютер или устройство. Отметьте второй вариант, который гласит: «Создать установочный носитель (USB-накопитель, DVD-диск или файл ISO) для другого ПК».
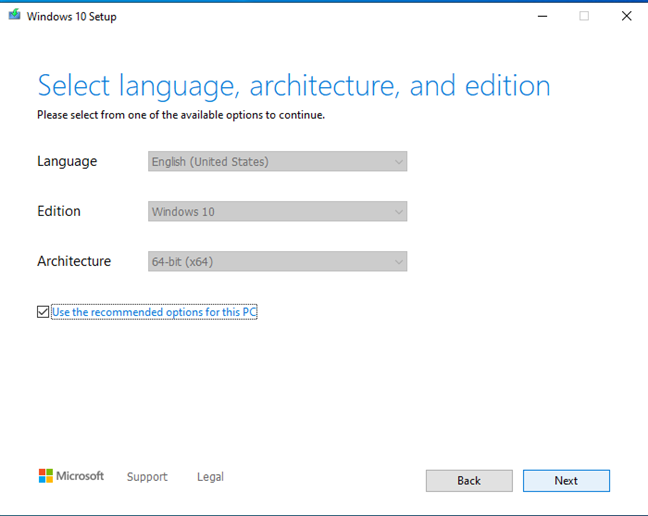
Затем выберите язык, редакцию и архитектуру, которые вы хотите использовать для создания установочного носителя. Архитектура может быть 64-битной, 32-битной или обеими. Мы рекомендуем использовать 64-битную версию как можно чаще. Вы также можете выбрать «Использовать рекомендуемые параметры для этого ПК», что автоматически выберет язык, редакцию и архитектуру, соответствующие ПК, который вы используете прямо сейчас. Выбрав нужные параметры, нажмите Далее.
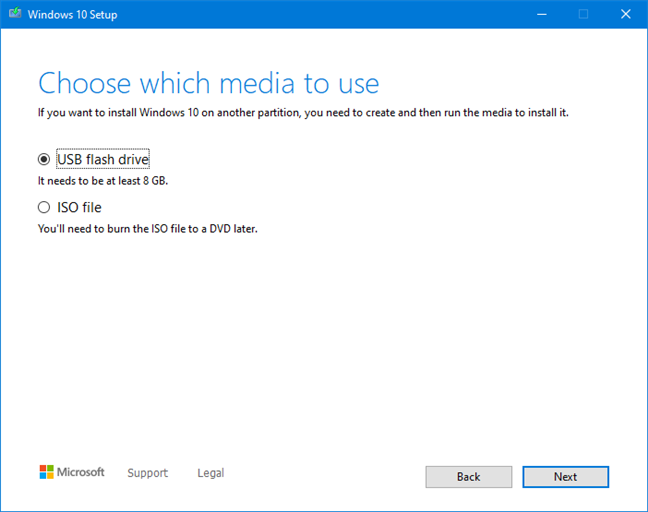
Затем выберите тип хранилища мультимедиа, которое вы хотите использовать. Выберите «USB flash drive» и нажмите «Далее».
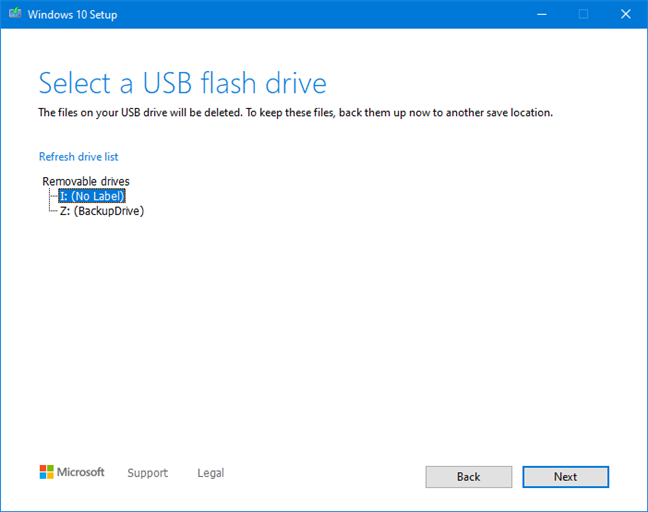
Вы видите все флэш-диски и внешние жесткие диски, которые подключены к вашему компьютеру или устройству Windows. Выберите тот, который вы хотите использовать для создания установочного носителя Windows 10. Не забывайте, что все данные на нем будут уничтожены. Убедитесь, что у вас есть его копия, прежде чем двигаться вперед.
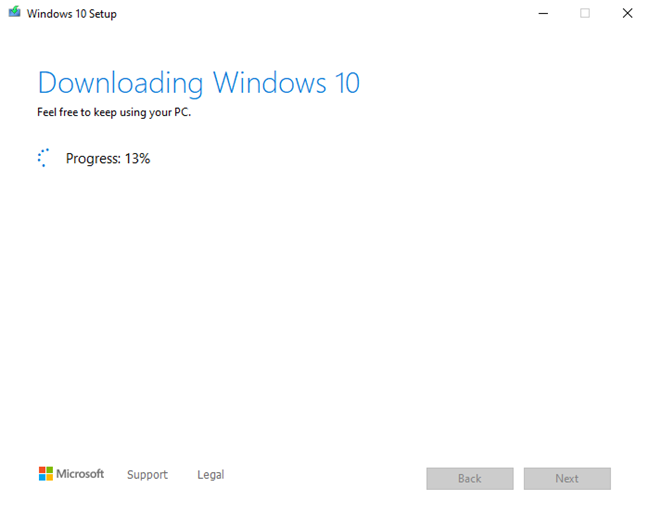
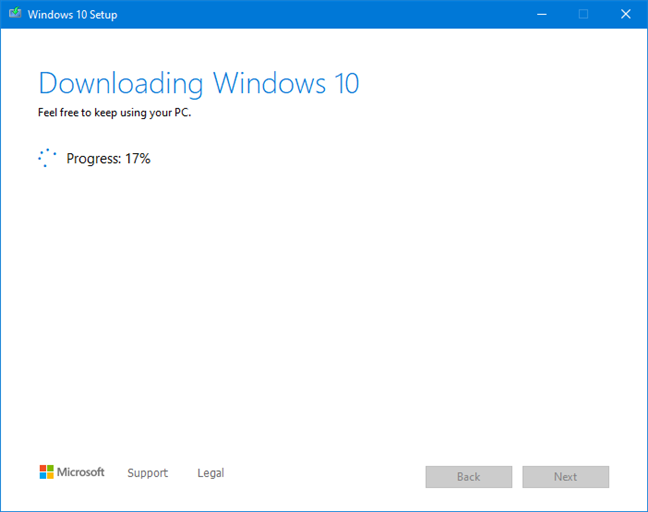
После того как вы выбрали USB-накопитель, Media Creation Tool начнет загружать последние версии установочных файлов Windows 10 на ваш компьютер или устройство. В зависимости от скорости вашего интернет-соединения и нагрузки на серверы Microsoft, это может занять некоторое время. Все, что вам нужно, это терпение.
После завершения загрузки проверяется целостность, чтобы убедиться, что все в порядке. Затем выбранный USB-накопитель станет загрузочным с самой новой версией Windows 10. Этот процесс может занять еще пару минут.
Когда вы закончите, вам сообщат, что карта памяти USB готова. Нажмите или коснитесь Готово , и затем вы сможете использовать этот диск для загрузки и установки Windows 10.
Заключение
Как вы можете видеть, инструмент Media Creation Tool интуитивно понятен и прост в использовании, даже если вы не являетесь техническим экспертом. Если вы будете следовать нашим инструкциям, у вас не должно возникнуть проблем при создании собственного установочного файла ISO для Windows 10 или создании загрузочной карты памяти USB для Windows 10 со всеми ее установочными файлами. Если у вас есть какие-либо вопросы, не стесняйтесь спрашивать в разделе комментариев ниже.
Некоторые особенности работы
Внешний HDD, приобретает файловую систему FAT32. Что предпринять? Нажимаем «Win+R», далее пропишите команду «diskmgmt.msc», для перехода к утилите управления дисками.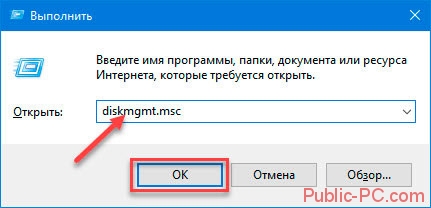
Отобразятся все разделы диска. Отформатируйте его.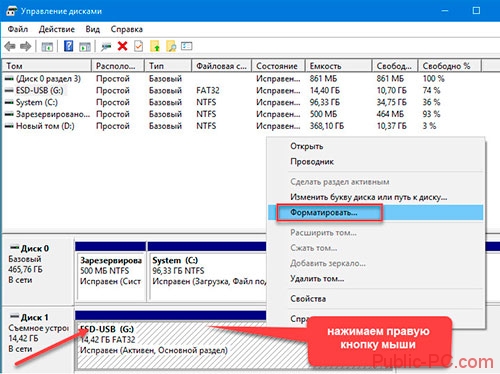
Программа не видит флешку
При работе появляется сообщение, что USB-накопитель не найден. Эта ошибка актуальна для Windows 7/10 разрядности 32/64. Что предпринять? Скачайте утилиту предыдущей версии, например, 10.0.14393.0 Некоторые флешки определяются в качестве накопителя, а как жесткий диск не распознаются. Отформатируйте ее в FAT32 через командную строку. Про это подробно описано в статье: «Как отформатировать жесткий диск? 4 четких способа!».
Проверка устройства на наличие ошибок
Откройте его в новом окне. Далее выбираем командная строка с правами администратора. В последних версиях ОС вместо командной строки будет написано Power Shell. Набираем «Файл»-«Запустить Power Shell».
Далее прописываем команду CHKDSK /G (указываете букву накопителя). Далее соглашаемся на разблокировку (пишем «Y», нажимаем клавишу «Enter»). Ждем окончания работы. Утилита проверит диск, исправит ошибки автоматически, или укажет возможные причины неполадки.
Media Creation Tool не запускается
Сбой происходит из-за неправильного распознавания утилиты системой безопасности, которая блокирует подозрительную активность. Отключите антивирус. Например, если установлен Smart Security, нажимаем его иконку правой кнопкой мыши, отключаем антивирус.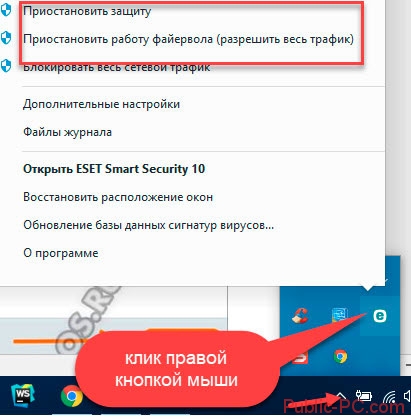
Не хватает прав на запуск
Откройте утилиту с правами администратора. Кликните по скачанному файлу правой кнопкой мыши, выберите соответствующий пункт.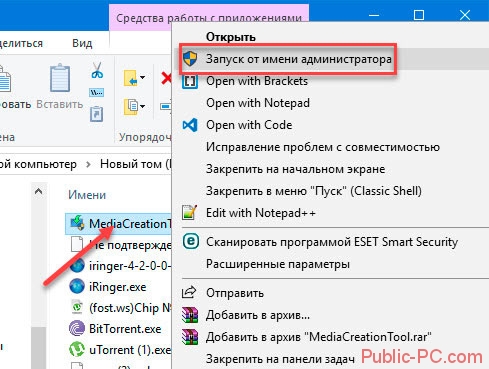
Очистка временных файлов
В адресной строке проводника напишите: %TEMP%. Далее нажимаем «Enter». Откроется папка где находятся временные файлы ПО, которое работало.
Удалите все ее содержимое, перезагрузите ПК. Как сделать проще? Используйте специальный софт. Подробнее об этом прочитайте в статье: «Как работает Wise Registry Cleaner».
How to use the Media Creation Tool to download an ISO file with the latest Windows 10 setup
You can also use the Media Creation Tool to create a Windows 10 setup ISO file. When the Windows 10 Media Creation Tool loads its user interface, it asks you to accept its license terms. Read the terms, and click or tap Accept to continue.

Accept the license terms for the Windows 10 Media Creation Tool
You are asked to choose what you want to do. Select «Create installation media (USB flash drive, DVD, or ISO file) for another PC,» and click or tap Next.

Choose to create installation media (USB flash drive, DVD, or ISO file)
By default, the Media Creation Tool chooses for you a recommended language, architecture, and edition of Windows 10. If you want to personalize these settings, uncheck the box for «Use recommended settings for this PC,» and make your selections. When you are done, press Next.
Select the language, architecture, and edition
You are asked to choose which media to use. Select «ISO file» and click or tap Next.
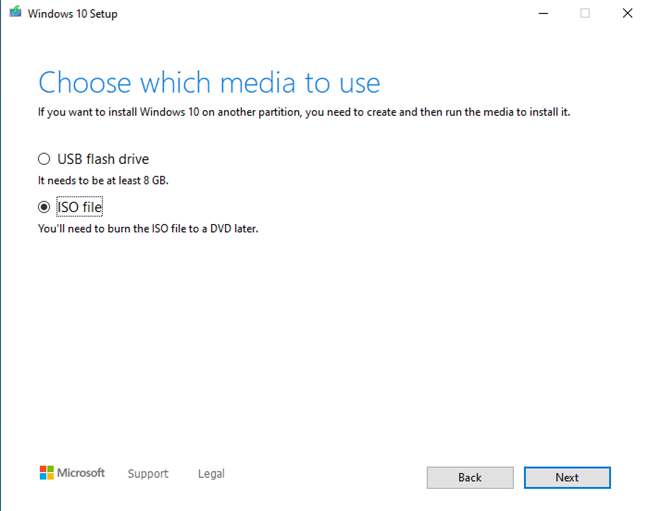
Select ISO file and press Next
The Windows 10 Media Creation Tool asks you to select where you want to save the ISO file and the name you want to give it. Browse your computer or device, choose the location that you want, choose a file name (by default it is named Windows.iso), and then click or tap the Save button.
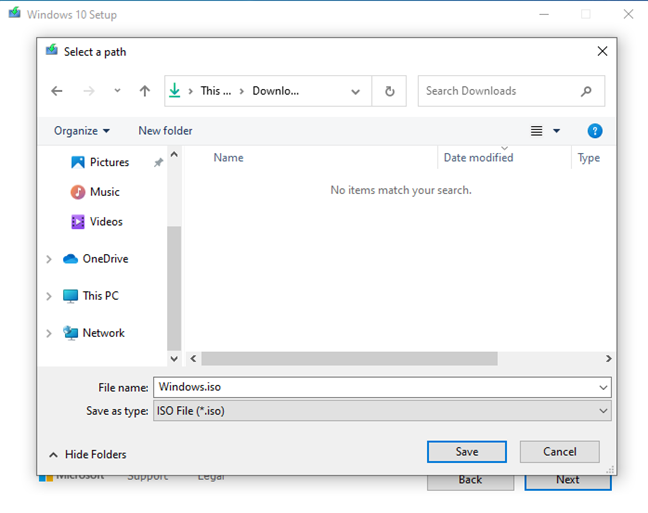
Choose where to save the Windows 10 ISO file on your PC
Media Creation Tool starts to download the latest Windows 10 installation files to your computer or device. Depending on your internet connection speed and the load on Microsoft’s servers, this might take a while, so give it a couple of minutes.
Downloading the Windows 10 setup files
Once the download is over, it is verified for integrity to make sure that everything is OK. Then, the ISO file is created in the folder you selected, with the file name you chose.

The Windows 10 setup ISO file is created
When the Windows 10 ISO file is created, you are shown where it was saved. Click or tap Finish.
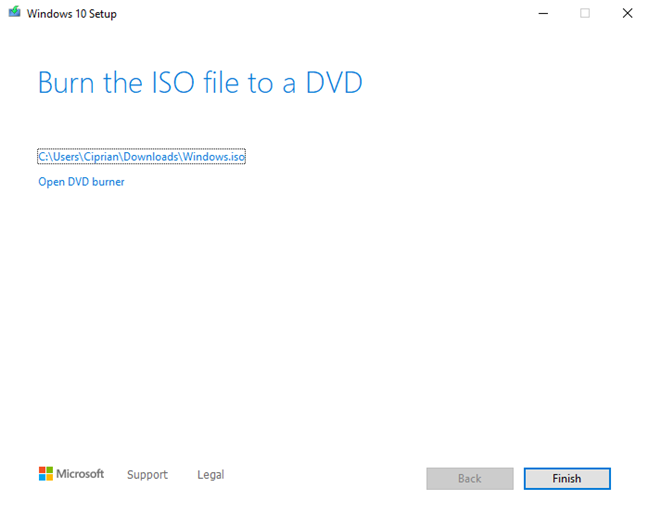
The ISO file was created
You can burn the ISO file with the Windows 10 setup to a DVD or mount the ISO file in a virtual machine.
Use the Windows 10 Media Creation Tool to create a bootable USB memory stick with the Windows 10 setup
You can use the Media Creation Tool as a Windows 10 USB tool. In other words, it can download the Windows 10 setup files and automatically create a bootable Windows 10 USB memory stick, which you can then use to install the operating system on any computer. When the Windows 10 Media Creation Tool loads its user interface, it asks you to accept its license terms. Read the terms, and click or tap Accept to continue.

Accept the license terms for the Windows 10 Media Creation Tool
Media Creation Tool needs a few seconds to «get a few things ready.» Then, it asks whether you want to upgrade your PC or create installation media that you can use to install Windows 10. Check the second option: «Create installation media (USB flash drive, DVD, or ISO file) for another PC,» and press Next.
Choose to create installation media (USB flash drive, DVD, or ISO file)
Next, you can choose the Language, Edition, and Architecture (32-bit, 64-bit, or both) that you want to use for the Windows 10 setup media. By default, the Media Creation Tool uses the recommended options for your PC. It is best to leave these options as they are and just press Next. However, if you uncheck the box for «Use the recommended options for this PC,» you can set things in detail before moving on to the next step.

Select the language, architecture, and edition
You are prompted about the media storage you want to use. Plugin the USB memory stick on which you want to store the Windows 10 setup files, select «USB flash drive» and press Next.
Choose to create a bootable USB flash drive with the Windows 10 setup
You see all the flash drives and external hard disks currently connected to your Windows computer or device. Select the one you want to use for creating Windows 10 installation media, and then press Next. Do not forget that all the data on the drive is going to get wiped during this process. Make sure that you have a copy of it before moving forward.
Select the flash drive or external hard drive for the Windows 10 setup files
Once you have selected the USB flash drive, the Windows 10 Media Creation Tool starts to download the latest installation files. Depending on your internet connection speed and the load on Microsoft’s servers, this might take a while. All you need is patience.
Downloading the Windows 10 setup files
Once the download of the Windows 10 setup files is over, it is verified for integrity. Then, the USB memory stick you selected is made bootable, with the newest Windows 10 setup. This process may take another couple of minutes.

Creating the Windows 10 media
When the process is finished, you are informed that the USB memory stick is ready. Click or tap Finish, and then you can use that drive to boot from and install Windows 10.
Click or tap Finish
Safely remove the USB flash drive from your computer, and use it as you see fit.
TIP: To install Windows 10 without problems, read: How to install Windows 10 from DVD, USB, or ISO file.
Windows 10 Media Creation Tool FAQ
How do I get Windows 10 media creation tool?
You can get Windows 10 media creation tool by visiting the Microsoft Media Creation Tool website. Then click the Download tool now button from the webpage. Then install and run the application on your PC. After that, you can choose to create installation media for another PC or upgrade Windows 10 with Windows 10 media creation tool.
How do I upgrade to Windows 10 using media creation tool?
First, visit the Microsoft support website. Click the Download tool now button on the page. Run the Media Creation Tool and click the Accept button to agree to the terms. On What do you want to do page, select Upgrade this PC now and click Next. Then follow the prompt to complete upgrade to Windows 10.
How do I create a bootable USB using Windows 10 media creation tool?
Prepare a blank USB flash drive with at least 8 GB and connect it to your PC. Download the free Windows 10 media creation tool from the Microsoft’s official website and run the tool. On the What do you want to do page, select Create installation media for another PC. Then select language, Windows Edition, and Architecture for the installation media. On Choose which media to use page, select USB flash drive and follow the prompts to create the bootable USB drive.
What is Windows 10 media creation tool?
Windows 10 Media Creation Tool is a free utility developed by Microsoft, which lets you create a Windows 10 installation USB drive or download its .ISO file that you can burn on to a DVD to install the operating system on a different computer. With Windows 10 creation tool, you can upgrade Windows to its latest version or create a Windows 10 installation USB drive/DVD disc to install Windows 10 or repair a Windows PC.
Upgrade to Windows 11 using Media Creation Tool
Chandan Pandit
September 3, 2021 11:20 PM
Windows
The beta build of Windows 11 has started rolling out to Windows Insider users. Windows 11 brings many improvements over the normal Windows 10 such as a new redesigned home interface, a new Microsoft store with native support for Android apps, a re-touched taskbar and icons, and more. The stable rollout of Windows 11 might happen in late 2021 or early 2022. Many users are willing to try Windows 11 on their PC, but they are not officially eligible for that. Well, for those, Windows 11 Media Creation is a helpful tool. The Media Creation tool can upgrade its system to Windows 11 seamlessly.
The Windows Media Creation tool allows users to sideload Windows 11. It’s more like flagship a custom ROM in Android with the help of TWRP recovery. For some sets of people, the creation tool is easy to use and operable, but it might come out as a bit complicated for beginners. So, in this post, we’ll de deciding on How to upgrade your system to Windows 11 using Windows 11 Media Creation Tool.
Important steps before proceeding
- After installing Windows 11 using the Media Creation tool, all of your user data might get cleared. So, make sure to take the backup of your data, so you won’t face any problem if your user data gets cleared.
- A good network connection is always recommended. It’s must require to install Windows 11 and to create a bootable USB Drive.
- If you’re creating the bootable USB instead of installing Windows 11, a USB Drive with a minimum of 8GB of RAM is always suggested.
Download Windows 11 Media Creation Tool
First of all, make sure you have registered in the Windows Insider program. To download the official file, you will need a Windows Insider account, So make it first. Now go to this official page and download the Windows 11 installation media. Click on Windows 11 icon and then click on the download tool now. Your Windows 11 Installation media will be now downloaded successfully in minutes (depending upon your network speeds).
After installing the file, run it on your PC system. After this, you’ll get a prompt saying “Getting a few things ready!”. Now, you’ll see two options: “Upgrade the PC Now” and “Create Installation Media (USB flash drive, DVD, or ISO file) for another PC”.
You can choose the option accordingly, if you choose “Upgrade the PC Now”, then your system will be upgraded to Windows 11. While, on the other hand, if you choose “Create installation media” then it will create a bootable file instead of upgrading your system.
Upgrade the PC Now
If you choose the “Upgrade the PC Now” option, then the Media Creation tool will start downloading the Windows 11 File and upon downloading successfully, you will be able to install it in your system. After successful installation, complete the setup and you will be now able to run Windows 11 in your system seamlessly.
Create Installation Media
If you choose the option “Create installation media.” then you will now get a prompt asking for language, edition, and architecture details of your system. Make sure to enter the details correctly and also you can choose the option “Use the recommended option for the PC!”. It will automatically select the option compatible with your system.
Now click on Next and you’ll get two options namely “Create USB flash drive” and “ISO file”. In create a USB flash drive option, it will create a bootable USB drive for you. And if you choose the second option, you will be able to burn the ISO file later to create a bootable USB drive or a DVD.
- If you select the “Create USB Flash drive” option, then make sure to connect the USB. The tool will automatically download and burn into the US connection. And you can flash it later.
- For the “ISO File” option, it will download the ISO file of Windows 11 and you’ll later have to burn it using any third-party apps to make it bootable.
We recommend you to use the “Create USB Flash Drive” option here, as it is easier to use.
Ready to Install
After creating the bootable Windows 11, plug the USB Drive in which you’ve installed the bootable file. Boot the PC into BIOS and install the system. You can now use Windows 11 seamlessly if you have followed all the steps mentioned above correctly. You can read our “types of Windows 11 product key”, “Password Reset”, and TPM 2.0 Bypass” article here.
How to Upgrade or Get Windows 10 without Installation
After reading the above, some users may find, even Windows Media Creation Tool is easy to use, it will still take you much time to upgrade or install Windows 10. Is there any much simpler way on Windows installation?
Actually, there is a method that can make Windows 10 installation as a breeze — migrate Windows 10 from another healthy PC to your PC with a Windows migration tool. If your friends or family are using the latest Windows 10, you can just use the Windows migration tool to migrate their Windows OS to your PC without reinstallation.
In this way, you do not need to create an installation media with Windows 10 Media Creation Tool and then use it to install Windows 10 as the whole process is time-consuming.
Well then, how to migrate Windows 10 with a reliable Windows migration tool? Here it is recommended to use MiniTool Partition Wizard Pro Ultimate Edition to migrate Windows 10.
MiniTool Partition Wizard is a reliable Windows migration tool as well as a professional partition manager trusted by tens of millions of people. It helps users to repartition hard drive, extend partition, convert FAT to NTFS, check files system, convert MBR to GPT without data loss, wipe disk, copy partition and migrate OS to SSD/HD, etc.
With MiniTool Partition Wizard, you can use Windows 10 operating system without installation.
Step 1. Shut down your computer and take out your system disk. Connect the HDD/SSD to another PC of your family or friends who are using the latest Windows 10 via a SATA-to-USB cable.
Note: If there are important files and data on your system disk, please make a backup as the process will delete all the files on your disk. If it is a brand new disk, then you can go ahead directly.
Step 2. Get the system cloning software to computer by clicking the following button. And run it to get the main interface.
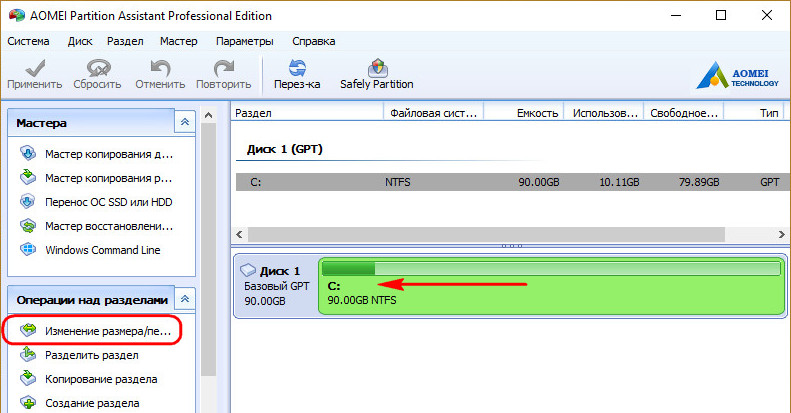
Step 3. Select the function Migrate OS to SSD/HD Wizard on the top toolbar.
Step 4. Choose option B to move operating system to another hard disk, as the following picture shows.
Step 5. Then, choose your HDD/SSD to migrate OS to and click Next.
Step 6. All data saved on your HDD/SSD will be destroyed, so please make sure there is no important file and data on the SSD or backup significant ones in advance. Then click Yes on the pop-up Window.
Step 7. Choose a copy method and click Next. If you choose the first one, system partition and boot partition will be enlarged to take up all space of the SSD. If you choose the second one, partitions will be cloned with the same partition size, but you can adjust partition size and location according to actual demands by dragging the handle.
Step 8. This page will remind you to reset BIOS order, giving the new SSD boot priority, so your computer can boot from the new system disk successfully. Then click Finish.
Step 9. At last, please click Apply button on the top to apply all these pending operations.
Since the Windows OS is still running, MiniTool Partition Wizard will ask you to restart the computer for data protection.
You see, it is very convenient to migrate OS to another disk with this Windows migration tool. If you find Windows reinstallation is troublesome and time-consuming, you can try using MiniTool Partition Wizard, which can be a big help.
Новая материнская плата? Потеря Windows
При активации Microsoft сразу связывает лицензию ОС с уникальным кодом различных компонентов вашего ПК, называемым также Product ID. Благодаря этому становятся возможным обновления и возможные переустановки Windows 10 на этом компьютере в будущем. Однако существует риск отказа системы из-за слишком большого количества замененных системных компонентов.
После покупки нового жесткого диска или же обновления BIOS «десятку» придется активировать заново — это мы поняли во время тестирования. Однако все иначе в случае с материнской картой: после замены этого критического компонента Windows 10 больше не может быть активирована на этом компьютере. Необходимо покупать лицензию или же сначала установить старую версию, а уже с нее провести обновление до «десятки».
Этот метод, впрочем, работает только с Retail-вариантами с ключом в комплекте. Если же у вас OEM-версия, а материнская плата от того же производителя, что и ПК и была заменена в рамках ремонта, необходимо к нему же и обратиться. Производитель несет ответственность за восстановление прежнего состояния вашего компьютера.
Результат
Результат может быть либо положительный (новая версия успешно установлена), либо отрицательный. Сами результаты могут не устраивать пользователя, например, система обновилась, но что-то не работает или тормозит.
Разберем частые ситуации:
Не удалось завершить обновление windows 10 — отрицательный результат. Для того, чтобы понять, что помешало полноценной установке — нужно смотреть логи и выявлять причину ошибки, но исходя из практики, таких причин не так много:
- Антивирус — нередко он мешает копированию некоторых системных файлов, что приводит к ошибкам. Рекомендуется выключать или даже удалять перед установкой апдейта;
- Драйвера — установите драйвера для неизвестных устройств и обновите для известных. Часто в логах можно найти ошибки инициализации некоторых драйверов, что и вызывает ошибки;
- Системные ошибки — периодическое сканирование системы через SFC и DISM не повредит.
- Была такая ситуация — windows 10 не обновляется до 1809, устройство есть в списке поддерживаемых (ноутбук Acer, новая модель). Не работал тачпад и камера — все драйвера установлены, выполнена переустановка Windows (раза 2 или 3). В итоге помогло обновление BIOS.
- Не работает обновление windows 10 — убедитесь, что ваше устройство или оборудование совместимо с новой версией ОС. Иногда ошибки возникает на неподдерживаемых и действительно старых устройствах;
- Попробуйте выполнить Inplace Upgrade. Если не получится, вы всегда можете переустановить систему с новой версией, если это столь необходимо — если же нет, то скрыть апдейт до лучших времён.
В этой статье мы рассказали, почему не обновляется windows 10 до 1903 и как решить эту проблему. Надеемся, что эта информация была полезна и помогла решить ваш вопрос.
Системные требования для установки Windows 10
- Процессор: с частотой1 гигагерц (ГГц) или быстрее или система на кристалле SoC.
- ОЗУ: 1 гигабайт (ГБ) для 32-разрядных систем или 2 ГБ для 64-разрядных систем.
- Место на жестком диске: 16 ГБ для 32-разрядных систем или 32 ГБ для 64-разрядных систем.
- Видеоадаптер: DirectX 9 или более поздней версии с драйвером WDDM 1.0.Дисплей: 800 x 600.
- Интернет-соединение: Для выполнения обновлений и работы определенных функций требуется подключение к Интернету.
- Подробнее о системных требованиях.
Windows 10 — операционная система для персональных компьютеров и рабочих станций, разработанная корпорацией Microsoft в рамках семейства Windows NT.
После Windows 8.1 система получила номер 10, минуя 9. Серверный аналог Windows 10 — Windows Server 2016.
Пользовательский интерфейс Windows 10 был пересмотрен для организации перехода между интерфейсом для обычного манипулятора и интерфейсом, оптимизированным для сенсорного ввода в зависимости от способа ввода.
Придайте вашему компьютеру новый вид! Измените свой компьютер, переключившись на светлый или темный режим.
Спите спокойно с ночным светом! При работе ночью включите ночной режим, чтобы снизить нагрузку на глаза.
Нажмите;клавиши с логотипом Windows + Shift + S чтобы открыть панель «Ножницы», затем проведите курсором по области, которую необходимо захватить. Область, обрезанная вами, будет сохранена в буфере обмена.
Говорите, вместо того чтобы печатать! На сенсорной клавиатуре выберите микрофон. На физической клавиатуре нажмите клавиши с логотипом Windows + H, чтобы надиктовать свои мысли.
В магазине Microsoft Store можно найти практически что угодно для своего устройства с Windows 10, включая самые последние игры, популярные фильмы и телешоу, ПО для творчества, приложения и многое другое.
Получите доступ к большинству функций и возможностей на ПК с Windows 10 при входе с учетной записью Майкрософт.
Создание установочного носителя с помощью средства:
- Нажмите Скачать средство сейчас (Windows 10 Media Creation Tool), а затем — Запустить. Для запуска этого средства необходимы права администратора.
- Если вы согласны с условиями лицензионного соглашения, нажмите Принять.
- На странице Что вы хотите сделать? выберите Создать установочный носитель для другого компьютера, а затем нажмите Далее.
- Выберите для Windows 10 язык, выпуск и архитектуру (32- или 64-разрядная версия).
- Выберите нужный носитель:USB-устройство флэш-памяти. Подключите пустое USB-устройство флэш-памяти емкостью не менее 8 ГБ. Все содержимое устройства будет удалено. ISO-файл. Сохраните ISO-файл на компьютере, чтобы создать DVD-диск. Скачав файл, вы можете открыть папку, в которой он сохранен, или выбрать команду Открыть устройство записи DVD-дисков и следовать указаниям по записи файла на DVD-диск.
- Создав установочный носитель, следуйте приведенным ниже указаниям по его использованию.
- После выполнения установки Windows 10, пожалуйста, убедитесь в том, что у вас установлены все необходимые драйверы устройств. Чтобы проверить наличие обновлений, нажмите кнопку «Пуск», щелкните Настройки > Обновление и безопасность > Центр обновления Windows и выберите команду «Проверить наличие обновлений». Вы также можете посетить веб-сайт технической поддержки изготовителя своего устройства, чтобы загрузить какие-либо дополнительные драйверы, которые могут быть необходимы.
Полезная информация
- Где взять ключи для Windows?
- Как самостоятельно установить Windows 10 и программы?
- Как ускорить работу компьютера Windows 10?
- Как сбросить Windows 10 до заводских настроек?
- Скачать Windows 11 оригинальный образ
- Как установить Windows 11
- Рекомендованные системные требования для ОС Windows 11
Загрузка …
Download Windows 11 Media Creation Tool
First of all, make sure you have registered in the Windows Insider program. To download the official file, you will need a Windows Insider account, So make it first. Now go to this official page and download the Windows 11 installation media. Click on Windows 11 icon and then click on the download tool now. Your Windows 11 Installation media will be now downloaded successfully in minutes (depending upon your network speeds).
After installing the file, run it on your PC system. After this, you’ll get a prompt saying “Getting a few things ready!”. Now, you’ll see two options: “Upgrade the PC Now” and “Create Installation Media (USB flash drive, DVD, or ISO file) for another PC”.
You can choose the option accordingly, if you choose “Upgrade the PC Now”, then your system will be upgraded to Windows 11. While, on the other hand, if you choose “Create installation media” then it will create a bootable file instead of upgrading your system.
Upgrade the PC Now
If you choose the “Upgrade the PC Now” option, then the Media Creation tool will start downloading the Windows 11 File and upon downloading successfully, you will be able to install it in your system. After successful installation, complete the setup and you will be now able to run Windows 11 in your system seamlessly.
Create Installation Media
If you choose the option “Create installation media.” then you will now get a prompt asking for language, edition, and architecture details of your system. Make sure to enter the details correctly and also you can choose the option “Use the recommended option for the PC!”. It will automatically select the option compatible with your system.
Now click on Next and you’ll get two options namely “Create USB flash drive” and “ISO file”. In create a USB flash drive option, it will create a bootable USB drive for you. And if you choose the second option, you will be able to burn the ISO file later to create a bootable USB drive or a DVD.
- If you select the “Create USB Flash drive” option, then make sure to connect the USB. The tool will automatically download and burn into the US connection. And you can flash it later.
- For the “ISO File” option, it will download the ISO file of Windows 11 and you’ll later have to burn it using any third-party apps to make it bootable.
We recommend you to use the “Create USB Flash Drive” option here, as it is easier to use.
Ready to Install
After creating the bootable Windows 11, plug the USB Drive in which you’ve installed the bootable file. Boot the PC into BIOS and install the system. You can now use Windows 11 seamlessly if you have followed all the steps mentioned above correctly. You can read our “types of Windows 11 product key”, “Password Reset”, and TPM 2.0 Bypass” article here.
4 Выборочная установка
После создания установочного носителя необходимо запустить с него компьютер. Перезагрузите его, установив DVD или USB-накопитель
Внимание: «флешка» не должна стоять в порте USB 3.0, поскольку не самые новые системы при запуске его не распознают
Кроме того, при необходимости измените порядок загрузки в BIOS, для того чтобы загрузочный носитель был увиден. Для этого, как правило, необходимо во время запуска нажать на клавишу «F1» или «Del». Какую именно, вы увидите либо на экране-заставке BIOS в самом начале процесса загрузки, либо в руководстве пользователя от разработчика ПК или материнской платы.
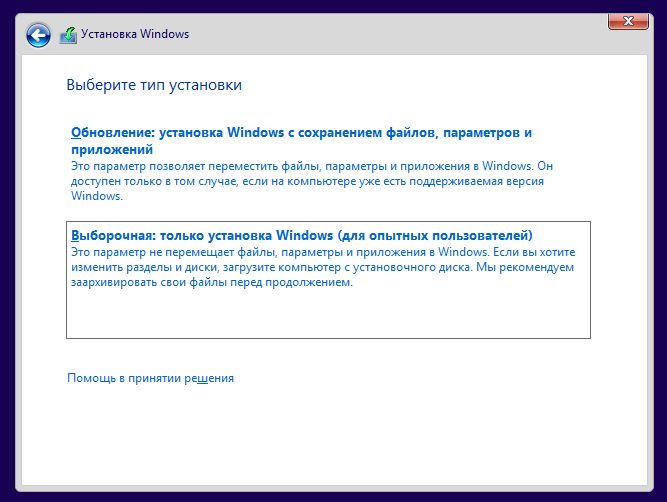
После успешного процесса загрузки появится окно установки Windows. В нем выберите язык, нажмите на «Далее», а затем на «Установить сейчас». При запросе ключа введите тот же, что и для прежней версии Windows. На экране «Выберите тип установки» для чистой установки нажмите на второй вариант — «Выборочная: только установка Windows (для опытных пользователей)». Вы увидите таблицу разделов ПК.
Здесь у вас есть возможность выбрать радикальную чистую установку либо создать папку с резервной копией старых программ и файлов. Прежней системой вы в любом случае не сможете пользоваться. Далее мы расскажем об обоих вариантах.
How to download the Windows 10 Media Creation Tool
If you’re wondering what the Windows 10 Media Creation Tool is, here’s the answer: a small executable file made by Microsoft, that allows you to download Windows 10 and create your installation media both on USB devices or in an ISO file. Furthermore, the Windows 10 Media Creation Tool also lets you directly upgrade your current computer or device to the latest version of the operating system.
The next question you might ask is: «How do I get Windows 10 Media Creation Tool?» To download the Media Creation Tool, open your favorite web browser and go to this webpage: Download Windows 10. Scroll until you reach the «Download tool now» button found in the «Create Windows 10 installation media» section.
Download the Windows 10 Media Creation Tool
Microsoft asks you to download an executable file called MediaCreationTool21H1.exe, with a size of 18.5 MB. The file name ends with the version number of the latest Windows 10 update. In our case, 21H1 is the version number for Windows 10 with May 2021 Update. Save the executable file for the Windows 10 Media Creation Tool somewhere on your PC and then run it with a double-click or double-tap.
Double-click on MediaCreationTool21H1.exe
When you see the UAC prompt on your screen, choose Yes to allow the MediaCreationTool21H1.exe to run.
UAC asks your approval to run the Media Creation Tool
Depending on what you want to do, read the next section of this tutorial or the one after it.
TIP: The future versions of the MediaCreationTool21H1.exe file and of Windows 10 will have a different version number at the end. To learn more about Windows 10 versions, read: How to check the Windows 10 version, OS build, edition, or type.
Выводы статьи
В бесплатной программе Media Creation Tool можно выполнить обновление Windows 10 до новой версии системы. Программа выполнит все необходимые операции, в итоге, на компьютере будет установлена самая последняя версия Windows 10. При настройках по умолчанию, в обновленной версии системы будут сохранены все данные пользователя и установленные программы.
Обновление Windows 10 в Media Creation Tool (видео)
Похожие публикации:
- Сравнение версий Windows 10: таблица
- Как отключить или удалить OneDrive в Windows 10
- Диск восстановления Windows 10
- Как установить русский язык в Windows 10 — 2 способа
- Индекс производительности Windows 10 — 5 способов